Thursday, November 29, 2018

Simply Sublime Smashed Red Potatoes

After looking at many many recipes, this is my take on a fantastic side dish!

Wow! When I first saw this recipe on The Pioneer Woman, I thought to myself that this was something I wanted to try - it looked interesting and delicious! 10 years later and after reading a whole lot of smashed potato recipes, tonight I finally put my spin on it. And it was crispy, tasty - just delicious! 
I made them in one of my trusty iron skillets, of course. Not only were they taste perfection, they looked perfect in that iron skillet! Much better than on a cookie sheet. Of course, if you're making them for a crowd, instead of just six, a cookie sheet is the way to go. (The variations on this are endless - include bacon bits, garlic, parmesan, etc. etc. etc.!) Enjoy!

All ingredients are to your taste. Below is for 6 red potatoes.

Preheat oven to 450º.

2 - 4 T. butter, divided
2 - 4 T. extra virgin olive oil, divided
6 medium sized red potatoes, washed
fresh ground sea salt
fresh ground (tellicherry) pepper
about 2 T. fresh rosemary, chopped (dried can be substituted)
12 sprigs of the tops of fresh thyme (dried can be substituted)
about 3 T. chopped fresh parsley
4 scallions/green onions, sliced thinly, green tops included

Preheat oven to 450º.

Put potatoes in a pot and cover with water. Gently boil until potatoes are done, about 20 minutes. In the meantime, melt half the butter and half olive oil in the skillet, on your stove, stir, then turn off heat. Melt the other half butter/olive oil mix in a microwave-safe bowl. Stir. 

Remove potatoes and let thoroughly dry. Place potatoes artfully in an iron skillet (see above) and gently flatten with an old fashioned hand-held potato masher. DON'T smash too fast or too hard - my first smashed potato was a mess! (Below, see that bottom potato? Smushed, not smashed!)


Lightly dab the tops of potatoes with the microwaved butter/olive oil mixture. Grate salt and pepper on the tops of the potatoes, to your taste. Sprinkle the tops evenly with the rosemary. Place, crossed, two sprigs fresh thyme on each potato. 

Bake for 25 minutes at 450º. Remove with spatula to each plate. Instruct folks to remove the thyme leaves off of each stem onto potatoes (or do it for them). Dig in! 


We enjoyed ours with an iron skillet steak. And a side salad. Well....that side salad was a good thought....that didn't happen. (sigh)


UPDATE:

Tonight the potatoes were smashed a different way! All was the same until the toppings were added: To the smashed potatoes: drizzle with melted butter and then toasted bacon bits. Roast in the oven until all is sizzling. Sprinkle with shredded cheddar cheese and bake until cheese is beginning to melt. Turn on the broiler and broil until cheese is beginning to brown. 


~~~

YUM!

'till we feast again! 
xoabb

Wednesday, November 28, 2018

A Missourahhh Girl's Take on a CT Lobster Roll

I've been in Connecticut longer than in my beloved Missourahhh...
This is my take on a beloved Connecticut-original.
Every once and a while, Stew Leonard's, my local kinda grocery store, has a sale on lobster tails. Four for $20.00. When that happens, I get 'em and make GB Connecticut lobster rolls.
Since I had hot lobster rolls first, very soon after we moved here in '78, it was a loooong time before I realized that there were two very different types of lobster rolls tied to New England. There's the New England lobster roll which, I believe, originated in Maine - it's cold and involves mayonnaise and celery, among other ingredients. Then there's the Connecticut lobster, which is warm and involves lots and lots of butter...and lobster meat. My favorite is that delicious CT roll! 

2 top-sliced/split hot dog buns, aka New England-style buns, (brioche buns if you can find them)   
4 lobster tails, about 1 lb. total, thawed, cut into chunks and lightly chopped 
1/2 - 1 stick butter, divided
1 t. paprika
1/2 lemon or 2 t. True Lemon crystals
parsley, fresh and chopped, about a handful

Melt 2 T. of the butter in the skillet and toast in the pan, the buns. Remove buns (duh!). Melt rest of butter (at least 1/2 the stick) and add the paprika and lemon. When hot, add the lobster meat and toss until the lobster meat is done. Toss the parsley on top and toss again to mix. Place half the lobster on each bun. Boil all the liquid off the skillet and spoon remaining butter onto the lobster meat. Serve immediately. Serve with salt if you have a salt-lover who is the recipient - salt will dry the lobster meat out if added during the saute.

(I've read a lot of different takes on this recipe - this is mine!)

~~~

YUM!
'till we feast again! 

xoabb

Tuesday, November 27, 2018

Those Sublime Nan Stetter Sloppy Joes

Best Sloppy Joe ever, courtesy of family friend Nancy Bokelmann Stetter
My hubby GB's mom lived next to Nancy and her family from 1955 until around 2000 and a deep deep friendship flourished and the Blytone-Bokelmann clan became family which remains to this day. Though GB's mom is gone, we still connect to each other. Nan gifted me her absolute perfection of a sloppy joe recipe about 40 or so years ago, shortly after GB and I were married. I've never wavered from it and every time I make it, it gets rave reviews! Thank you, Nan!!

All ingredient amounts are estimates. Nan's recipe calls for Heinz ketchup. I use Heinz Chili Sauce instead as it's not as sweet. Whatever, it must be Heinz!


Brown in butter: 
1/3 C. diced celery (celery salt can be substituted)
1/3 C. diced onion
1 1/2 lbs. hamburger

Drain fat, then add:
2 T. brown sugar
2 T. apple cider vinegar
2 T. Lea & Perrin Worchestershire sauce
2 t. Coleman's dry mustard (French's does in a pinch)
cayenne pepper to taste (we like it with a BITE)
1 12 oz. bottle Heinz chili sauce (or equivalent 12 oz. Heinz ketchup)
1 12 oz. bottle full of water

Stir well and simmer until thickened. Adjust seasoning to your taste. Serve on hamburger bun. (I've fallen in love with brioche buns - that's one in the above photo - and serve the sloppys on those.) I always add more vinegar, Worchestershire and mustard - sometimes I give it a squirt of French's yellow mustard. You need to be sure it's cooked down so the flavors blend and intensify. Cayenne adds a nice kick! Enjoy!


~~~

YUM!

'till we feast again! 
xoabb

Monday, November 26, 2018

Charred Butternut Squash - YUM

Roasted and then broiled, all kinds of butternut goodness!

I love all winter squashes, (well, spaghetti squash not so much). There are a lot of recipes online for roasted squash with pure maple syrup, but not many for charred butternut squash. While this recipe was a happy accident, it's one that's just delicious and worth repeating. Confession time: I forgot about the fact I was broiling the squash after it's 40 minute bake....uh oh...char time! 
Stew Leonard's, a local food store here in Norwalk, CT, sells clamshells of butternut squash that are peeled and cut up - makes this entire recipe easy easy. 


Preheat oven to 400º.

1 16 oz. container prepared butternut squash (or 1 whole butternut, peeled, seeded and chopped)
salt, to taste, about 1 t.  
pepper, fresh ground, to taste, about 2-3 t. (I like it hot so add more)
2-3 T. pure maple syrup - Aunt Jemima just won't do
1-2 T. extra virgin olive oil

cookie sheet, parchment paper, aluminum foil

Place squash in a bowl. Sprinkle with salt and pepper and toss well. Pour maple syrup on the squash and toss well again. Add the olive oil and give all a final toss. Put squash on a parchment paper-lined cookie sheet and cover with the aluminum foil. Bake for 20 minutes. Take foil off and bake for an additional 20 minutes. Turn on the broiler and broil until your desired amount of char occurs. I was lucky - almost nuked mine. Watch carefully while the squash is broiling! You can make this ahead as it's delicious at room temperature. Reheat if you want. 

Recipe by me and a lot of other folks.


~~~

YUM!

'till we feast again! 
xoabb

Sunday, November 25, 2018

Egg Breakfast Sandwich - da best!!!

A delicious breakfast sandwich! Eggs, cheese, bacon on a brioche bun. Heaven!
I have a job where I can have breakfast at a reasonable hour - like 10:00am - instead of before I leave for work - like 7:20am. For a while we were gifted fresh banty eggs from a parent at our school. From that, I got the idea of bringing my own eggs and buns to make a fresh egg sandwich for my breadfast at school. Around 10:00am. Much more reasonable hour to eat breakfast as far as I'm concerned. So...I bring fresh eggs, Walmart bacon bits, a slice of cheese and a bun - and on the days I'm not having Jane's 2 ingredient bagels with peanut butter - I'm having the above delight! Of course, this whole thing is made better because her neighbor makes this awesome Portuguese pepper sauce that I mix into the eggs. I canNOT tell you how good this Portuguese pepper sauce is! Da Bomb Diggity! Add your own hotness and enjoy!

butter, to smear on the bowl
2 eggs
hot sauce, to your pleasure
1 bun - I love brioche buns
1 slice cheese, to your liking
bacon bits, if you want
salt and pepper to your taste

Smear a small cereal bowl with butter. Crack 2 eggs into bowl, mix well. Season with salt and pepper and hot sauce to your taste. Microwave for a minute, stir, add cheese slice and microwave for another minute. Scoop egg onto the bun and enjoy!!


~~~

YUM!
'till we feast again! 

xoabb

Saturday, November 24, 2018

Summertime Peach & Basil Shortcake


Sweet Missourahhh peaches - they were incredibly good last summer, unlike our CT peaches that had no flavor. At all.
Tossed with fresh basil ribbons. 
I spend a good portion of every summer in COMO, now with my dad, and before she died, with both my parents. I'm lucky enough to work in a school system, so have regular vacations all year long, with the summers completely off. My sibs, Carrie and Bill, are able to do the same and often our visits overlap. Nice! This summer, my sis and I visited at the same time, and one of our cooking challenges, now that mom is gone - and our father's sweet tooth hasn't abated one bit - is coming up with new desserts for him. Mom was one of the best amateur chefs that has ever cooked, so it's hard to top what she could do - with one hand tied behind her back! Well, with this recipe, we certainly succeeded! The key to this is to have super sweet local peaches. And this year, in MO, they delivered! They were the very best flavorful peaches we've had in years! When I came back to CT, I immediately went to the farmer's market and bought peaches. Several times. And at several different farmer's markets. Absolutely. No. Flavor. In any of them. Amazing it was such a good peach year in MO and a hideous one in CT. While you can make this any time of year, summertime peach season is the ideal time! Sis Care & I made this for dad in August 2018. Truly the best shortcake I've ever had - the first I've actually liked. And, basil combined with peaches is just an incredible flavor combination!

Our shortcake. This recipe makes one of the only shortcakes I actually like.
Not a big fan usually.


Topping:

4 C. peeled, sliced peaches, about 3 lbs. (local if at all possible, southern only if not)
1/4 C. sugar
1/3 C. or so small fresh basil leaves cut into ribbons
1 1/2 T. fresh lemon juice

Shortcake:

2 1/4 C. flour
1/3 C. sugar, divided
1 T. baking powder
1/2 t. baking soda
1/4 t. salt
a grating of nutmeg
6 T. chilled butter, cut into pieces
1 C. buttermilk (or 1 C. (not skim) milk w/1 t. cider vinegar - let stand for 15 minutes)
cooking spray
1 1/2 t. 1/2 & 1/2 
1/4 cup sliced or slivered almonds


To prepare the topping, combine peaches, sugar, basil and lemon juice in a bowl; let stand 1 hour. 

Preheat oven to 400º. 

To prepare the shortcake, lightly spoon flour into dry measuring cups and level with a flat knife edge. Combine flour, 7 T. of the sugar, baking powder and soda and salt in a bowl; stir with a whisk. Cut in butter with a pastry blender or two dinner knives until the mixture resembles a coarse meal. Stir in buttermilk with a dinner fork just until combined (do not over-mix). Spoon the dough into a 9" round metal baking pan coated with cooking spray. Gently brush the dough with milk. Evenly sprinkle with the remaining sugar and almonds.

Bake at 400º for 23 minutes or until a toothpick inserted in the center comes out clean. Cool for 5 minutes in the pan on a wire rack. Remove shortcake from the pan and cool completely on the wire rack. 

Cut shortcake into 12 wedges and then cut each wedge in half horizontally. Top each bottom with 1/3 C. peach mixture and, if desired, a scoop of vanilla frozen yogurt or a spoonful of whipped cream. Artfully lay top half of the wedge on top, Enjoy!

This recipe was in the June 2012 Cooking Light magazine and is by Ruth Cousineau. 


~~~

'till we feast again!
xoabb

Friday, November 23, 2018

Donut Holes - One of my Very Favorite Things!!

Donut Holes!!!
YUM!!!

When I was growing up, we used to go to Staunton, IL to visit our mom and dad's best friends, Cathy and Jim Hawkins and their four kids, Susan, Sally, Jim and Teresa. We always had a whale of a time, playing together and playing jokes on each other, (Carrie, remember the time when Jim said his farts could be lit on fire, threw his legs over his head and Susan lit a lighter as he let out a TREMENDOUS fart - that actually blazed four feet from his butt?? Pretty special that!) and causing general mayhem. The other thing I remember from that time is visiting the Ubans. They were also good friends of our parents and the Hawkins. Peggy Uban's specialty was glazed donuts. Beautiful wonderful glazed donuts. While I don't have her recipe, daughter Brynnly came up with a fairly close recipe that brought me back to one of our childhood delights.


For the donut holes:

oil for frying in a Fry Daddy (or equivalent pot)

1 C. milk
1 large egg
2 C. flour
2 T. sugar
4 1/2 t. baking powder
1/2 t. salt
1/4 C. butter, melted

For the glaze:

1 1/2 C. powdered sigar
3 1/2 T. whole milk/cream
2 t. vanilla extract

Mix all together

For the sugar-cinnamon mix:

sugar to taste
cinnamon to taste

Mix all together


Add the oil to your Fry Daddy or equivalent pot. Put a grate on a baking/cookie sheet.
In a bowl, whisk together the milk and egg. In a separate bowl, whisk together the flour, sugar, baking powder and salt. Stir in the egg/milk mixture. Now stir in the melted butter, and mix until a soft dough forms. Once the oil reaches 350º, use a small scoop or your fingers to drop about 1 T. of dough into the oil, being sure not to over-crowd the pan. Fry the donut holes, flipping them over in the oil, for about 2 minutes or until they're golden brown, Using a slotted spoon, transfer the donut holes to the grated baking sheets. Allow the donut holes to cool slightly. Then, either roll in the glaze or in the sugar mixture. Place back on the grates. After a minute, serve...and go to heaven!!!


~~~

YUM!

'till we feast again! 
xoabb

Tuesday, November 20, 2018

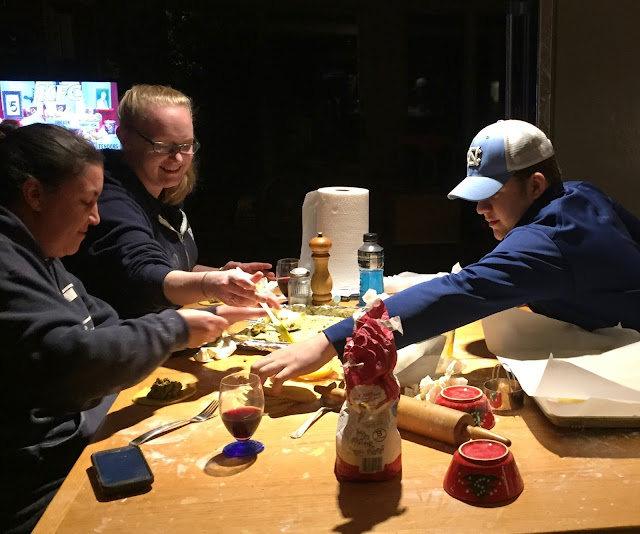
Cayman Meat Patties - Definitely a Group Effort

l to r, Kat, Brynnly and Connor assembling the Cayman meat patties.
So the table's a mess. Results were sublime!
(Red Christmas bowls made perfect 4" dough rounds.)
This happened to be the last thing our mother made. She and Brynnly made these together about 2 weeks before mom died. They had a wonderful time doing so, and I had a lovely time watching them and chronicling their shared cooking joy. This night, the three musketeers, above, made both appetizer-size patties (second photo) and then full-size patties (first photo) for entrees. SO good! 

The patties ready for baking - entree size


The deliciousness after baking - appetizer size

For the meat filling:
1 1/2 lb. chuck pound roast (you can use already ground chuck)
1 large onion, roughly chopped
6 scallions (green onions), green tops included, roughly chopped
1 scotch bonnet pepper (or equivalent), seeded
2 garlic cloves
2++ T.  Jamaican Blue Mountain Country curry powder, a mixture of mild and hot
6 sprigs fresh thyme or 2 t. dried thyme
1/2 t. ground all spice
2 T. vegetable oil
3/4 C. bread crumbs
1/2 C. water
salt and pepper to taste
BumHot (our family blend) or hot pepper flakes/cayenne to taste

Cut beef into 1" cubes, removing all fat and tendons. Place meat on a pan in a single layer and put in freezer for about 30 minutes or until meat is firm but not frozen hard. While meat is firming, put the onion, scallions, scotch bonnet and garlic in a food processor and mince by pulsing on and off until all is finely ground. In a large skillet, heat the oil and add the mixture along with the curry, thyme and allspice. Cook until all is cooked, but not browned. Set aside. 
In batches, place the partially frozen chuck in the food processor and pulse until meat is minced very finely. Add the meat to the veggie skillet and cook over medium heat until all the pink is gone and meat is well cooked. Add the bread crumbs, salt to taste and pepper to taste. Stir well to blend and adjust seasonings - especially the level of pepper heat - to your taste. Simmer for about 10 minutes over low heat until all liquid is gone. Set aside and let cool. 

For the pastry:
2 1/2 C. flour
1 - 2 T. Jamaican Blue Mountain curry powder
1 t. BumHot (or hot pepper flakes/cayenne to taste)
1 t. tumeric (for color, optional)
3/4 t. salt
1 1/2 sticks cold butter, cut into large chunks (can also use 1/2 lard) 
1/3 C. ice water

In food processor, fitted with a steel blade, put all dry ingredients in and pulse to mix. Take dough out and knead very lightly on a floured board. If dough is sticky, add a bit more flour. 

To assemble Cayman meat patties: 
Preheat oven to 375º.
1 egg, well beaten (for glazing)
Roll dough out into a long piece that about 1/2" thick. Tear off a portion of dough and roll as thinly as you can on a lightly floured board. Cut into an approximately 4" circle (for entree portions) or a 2" circle (for appetizer portions). Place filling on half the circle (about 2-3 T, for an entree, 1-1 1/2 T. for an appetizer size). Brush edges with water and fold over and seal. With fork tines, seal the edges. Place the patties on a parchment paper lined cookie sheet. Continue till all the meat and (hopefully) dough is used up. Glaze the tops of the patties with the egg wash. Bake for 15 - 20 minutes (appetizers) or 20 - 25 minutes (entrees) or until the edges are golden brown. Serve hot, warm or at room temperature. Reheating in a microwave, tho it works, is not recommended. 

You can make hot patties with any ground meat you want. They can be made any size you want as well. And if you can find callaloo, a Caribbean veggie, (aka amaranth), you can make this vegetarian!

A family favorite!
~~~

YUM!

'till we feast again! 
xoabb

Monday, November 19, 2018

Peanut Butter Cookies - Flourless to Boot

Best peanut butter cookies EVER!
Peanut butter cookies are my very favorite cookie! Actually, it's one of the very few cookies I like - can't really think of another one...well except for Hyacinth's Everything Cookies, which are simply sublime. I saw this recipe on some website and thought I had to try it as it looked easy enough for even me, a total non-baker, not to screw up. Guess what? I didn't! While traditional recipes call for flour and a bunch of other ingredients, this recipe only has four ingredients! If you're a peanut butter cookie fanatic, I promise these will be the best you've ever had! Really don't know why you'd make them any other way! (Best thing? No exact measurements required!)

1 heaping C. smooth (or chunky) peanut butter (I used Skippy)
3/4 C. sugar
1 t. vanilla extract
1 egg

Preheat oven to 350º. 
Put all ingredients in a bowl and mix very well. Be sure all the egg is completely incorporated. Shape dough into balls and put on a parchment paper covered cookie sheet. My cookie balls were WAY too big - I only had 15 cookies (and I should have made smaller 1" or so cookie balls, to yeild 30 cookies). When they're on the cookie sheet(s), flatten with the tines of a fork. (Obviously from the photos, I need to work on my fork tine flattening skills!) Bake for 10 to 15 minutes - time will vary slightly based on your oven - just check often for doneness. Place cookie sheet on a rack and cool for at least 10 minutes before moving to a serving platter. Enjoy!! 


~~~

YUM!

'till we feast again! 
xoabb

Sunday, November 18, 2018

Beef & Butternut Slow-Cooker Stew - MAJOR yum

Beef & Butternut Stew
before the slow-cooking
Jane (my good friend and co-worker) told me about this really great food blog called Skinny Taste. My first introduction to her recipes were her crazy-good 2 ingredient bagels - you've gotta try them - sublime they are! And now on to her stew. Jane has made it and said it was just delicious - her family thought so too - so I decided to give it a try, even though I'm the only one in my family that likes butternut squash. (Didn't tell the hubs it was squash. Guess what? He ate it and LOVED it! Sneaky, that's me!) Skinny Taste's Gina Homolka wrote that she found the recipe in one of Giada de Laurdentiis' cookbooks (Giada's recipe here) and changed very little of it. 
The recipe calls for kabocha squash, which I couldn't find. It was suggested substituting butternut squash, which I did, and the lovely time-saving thing was that Stew Leonard's has containers of already peeled and cut up butternut squash! Time saver! 
Since we didn't start to make this until the afternoon, we ended up slow-cooking it on high for about 4 1/2 hours instead of the original on low for 8 hours. Can't imagine it would have been any better cooked the 8 hours! 


butter - used for sauteing
1 large sweet onion, large diced
2 cloves garlic or same amount of tube garlic
1++ T. fresh rosemary, chopped
1++ T. fresh thyme, chopped
2 T. or so flour
salt & pepper to taste
2 lbs. stew beef, trimmed and cut into 2" or so cubes
1/2++ C. Marsala wine
1 lb. butternut (or Kobucha) squash, peeled, seeded and cut into 1" pieces
1 14.5 oz. can petite diced tomatoes
3 C. organic beef broth
2 T. fresh parsley, chopped, for garnish

*4 T. butter

*4 T. flour

crusty baguette

egg noodles 
baby peas

In a large skillet, heat some butter over medium-high heat. Add onion, garlic, rosemary and thyme and saute until onion is tender, about 6 minutes. Set aside in crock pot. Put flour, salt and pepper in a large bowl and mix. Add the beef and toss to coat. Saute beef in batches until browned on all sides, adding more butter as needed. Set beef aside in crock pot. Add Marsala and beef broth to skillet, being sure to scrape all the brown bits up from the bottom. Pour broth over the beef/onion mixture in crock pot and mix well. Add the can of tomatoes and the butternut squash pieces and gently mix again. Cover and cook on high for 4 - 5 hours, or low for 8 hours. 


*(This step is optional; we wanted a thicker gravy/sauce.) Heat the 4 T. butter in a small skillet and stir in the 4 T. flour. Stirring constantly, brown the mixture. When browned, stir by T.'s into the stew until you get the thickness you desire. (This wasn't part of the original recipe, but we decide we wanted a thicker ~gravy~ than the recipe gave produced.)


When done, you can throw a bag of baby peas in the crockpot (just before serving), stir and sprinkle the top with parsley. 


We served this over egg noodles and we threw the bag of peas in with the noodles (just before the noodles are drained) instead of in with the stew. Either way, it's delicious!


Heat the baguette.


Delicious!

~~~

YUM!
'till we feast again! 

xoabb