Wednesday, December 5, 2012

Hot 'n Sweet 'n Spicy Walnut Goodness

Hot 'n Sweet Walnuts by annbumbly
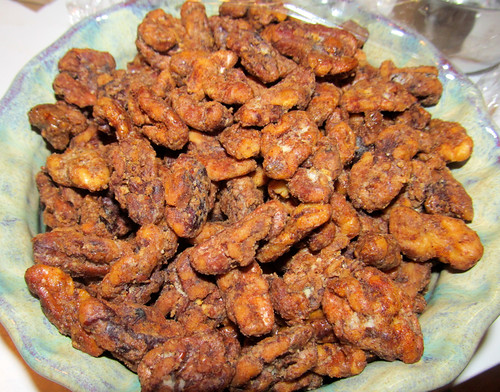
Hot 'n Sweet 'n Spicy Walnuts
We met for our Gourmet Group recently and this time our theme was '50's and '60's Gourmet magazine recipes. My contributions were part of the appetizer round and were the above spiced walnuts and strawberry daiquiris. (Got off pretty easy this time around!) The daiquiris were the frozen mix bought at the grocery store along with a fine bottle of Bacardi. They were good, but soooo sweet, we couldn't manage more than one each. The walnuts were simply sublime. Wish I could take credit for inventing the recipe, but I can't. As usual I've now tweaked it a bit (no cloves - didn't have any) and the original recipe suggested that the cayenne was optional. How silly is that? Cayenne is never optional as far as I'm concerned!

The T'nG:
1 - 1 1/2 lbs. walnuts
6 T. butter, melted
1/2 C. confectioner’s sugar (less to taste
1 1/2 t. ground cinnamon, (more to taste)
1/4 t. ground ginger, (more to taste)
1/4 t. ground allspice, (more to taste)
1/8 t. ground cloves, (more to taste)
1/8 t. cayenne pepper – (I always use a bit more - we like 'em kickin')
sea salt – optional 
Preheat oven to 325º.  In a bowl, stir the walnuts and butter until combined.  Add sugar and stir to coat evenly.  Bake on cookie sheet 15 minutes, stirring occasionally.  Put nuts back in your bowl and toss well with all seasonings.  Put back on the cookie sheet and bake for another 15 minutes – be careful not to brown too much.  Let cool in oven.  When completely cooled, place in airtight container until ready to serve.  4 cups.  From:  The Norwalk Hour; edited a bit by moi.
~~~
Above is the rest of our Gourmet magazines meal...
Of course I didn't think to take a photo of our meal until after we'd eaten and it was suggested that a photo should be shot of all the food, along with all the magazines. Everything looks served from, because it was. (There wasn't a whole duck side left, so we just plopped what remained down on the potatoes.)

We started our meal with the sweet 'n spicy nuts, on the far right. Stephanie, also on appetizers, made two "pates", one a cooked shrimp pate that was delicious, and the second, a chicken liver pate that, somewhere along the way, went horribly wrong. Steph followed the recipe to a "t" as she'd never made it before. It looked like, well, let's not go into that. I tasted it and it actually was tasty, just the looks of it...O dear!  That lovely veggie dish was the ratatouille Julie made. She's an excellent cook that I don't think has ever followed any recipe to a "t". Doesn't matter. Everything that comes from her kitchen is delicious! Next to that is our nearly finished escalloped potatoes and lying in the middle is the very last piece of grilled duck. Suzanne made the potatoes and Brian barbequed the duck. Excellent! Last but certainly not least was our dessert  - a Rum Custard made by Patty. It was one of the most delicious desserts I've ever had - a sentiment shared by all of us. Thankfully Patty has the recipe and, for your enjoyment, here it is:

The T'nG: 

for 10 -  12 servings:


4 C. heavy cream
1 C. sugar
12 egg yolks
3 T. white rum

Preheat the oven to 325º. In a double boiler, cook the heavy cream and sugar together until the sugar is incorporated. In the meantime, beat the egg yolks and slowly add them to the cream mixture. Add the rum and stir until all is combined. Prepare your bain-marie (hot water in a rimmed pan that's just deep enough to come up to the edge of the custard - remember the containers will make the water rise and you don't want it to spill into the containers.) When custard is smooth, pour into individual ramekins and place in the bain-marie bath. Bake in the oven until custard is set, around 20 - 30 minutes. Remove from oven and just before serving (warm or room temp - both are excellent) sprinkle the top with cracked pistachio nuts. DELICIOUS!

We used to keep a recipe record of each time we've broken bread together, but, alas, that fell by the wayside (um, thanks to moi). We'll start our 12th year together this coming February!  Gatherings...love them!


~~~
YUM!

till we feast again!
T'nGG

Tuesday, October 2, 2012

Kuri Squash Deliciousness

Kuri before baking - such a beautiful veggie!

Kuri after the bake
In September of 2010, daughter Remy went to MO to stay with her grandparents while she finished her last year of college. On so many levels, it was one of the best years the three of them had, and when it came to food, a true match made in heaven! Mom is one of the best cooks out there - just ask any of her family or friends- and Rem isn't far behind. They both love ~good food~ and neither will settle for junk of any kind. 
Shortly after Rem arrived, she and mom went to Columbia's Farmer's Market, (it's huge and one of the finest farmers markets I've ever seen.). There, they discovered a vendor that had a squash mom, let alone Rem, had never heard of. So, of course, they bought one! Coincidentally, one of my mother's favorite food bloggers, David Lebovitz had a post dedicated to kuri and other squash, so in very short order, they both went from knowing nothing about kuri to deciding it was their very favorite of all the winter squashes! 
Fast forward a year and a half and Rem is on the way back to Connecticut. With her kuri squash seeds in hand. And when she accepted a teaching position at Hand-In-Hand for Haiti Foundation's school, Lycee Jean Baptiste Pointe du Sable (in Pont Leocan, St. Marc, Haiti), yup, the seeds went with her!  In April she gave the seed to the school's gardener to plant, but as she told me, the soil in Haiti is awful so she didn't have much hope they would actually sprout and grow, (though water melon grow in abundance everywhere - about the only thing that does). 
Fast forward again to this September 1st when Remy was back in Haiti after spending the summer here. She told her grandmother she walked by the garden and thought she saw peeks of kuri orange through all the green foliage. A short time later, Rem saw the school's gardener walking toward her with a huge grin on his face carrying the school's first ever kuri harvest to her. A Haitian garden success! 
Mom and Rem used Mr. Levovitz's post as their guide (he pointed out you don't need to remove skin on a kuri, it just sort of melts away during baking and you can't tell any difference between the skin and the flesh) as did I last night. Hands down, this is one of the most delicious squashes I've ever eaten! One word of caution, though. Be very careful when cutting it open and then into the wedges. There is a liklihood you could lose a finger because, before it's baked, the squash is super firm and very unwieldy. I managed to escape unscathed. Which rather surprises me...
If you're curious, go here  or here for more info on kuri squash.

The T'nG:

a kuri squash (Whole Foods has them right now), size based on how many you're feeding
a medium onion (I used a red onion)
4 - 6 garlic cloves
rosemary, fresh (or fresh thyme, or sage)
extra virgin olive oil
fresh ground black pepper (I always use tellicherry peppercorns - love their flavor best!)
sea salt

parchment paper (optional)

Preheat the oven to 400º. Cut a bit off the top and bottom of your squash so it sits squarely on your cutting board while you cut it in half. Once cut in half, scoop out the seeds and all the stringy innards. (I didn't scrape all the stringy stuff out enough, and my cut wedges had a layer of greyish stuff that I then had to cut off.) Place the pieces in a ziploc bag. Peel onion and then cut in half from the top to the root. Cut the onion from top to the root in 1/4" or so strips and add to the ziploc bag. Pour in a good amount of your EVOO, seal the bag and toss well to coat all. Divide evenly between 1 or 2 baking sheets that are covered with parchment (parchment is optional - makes clean-up easier). Make sure the wedges are placed as above so they don't touch. That allows them to caramelize and not steam. Be sure the onion is evenly spread if using more than one tray. Add halved garlic cloves to your tray(s). Chop up a handful of rosemary (what I used) and scatter evenly over all. Add your pepper and salt. Put in the oven and roast for 20 - 30 minutes, until the squash is done. Serve. Take your first bite and be transported to that lovely place where food is like a little bite of heaven.

The Remy daughter's T'nG:

"Lately, I have been tossing mine [kuri squash] with olive oil, diced garlic, a diced habenero pepper, a coating of coriander, a touch of cumin and salt to taste, baked at 420 for 30 - 40 minutes. The roomies love it!"

~~~

YUM!

till we feast again! 
xoabb

Monday, July 9, 2012

Any Fruit Crisp - Mum Bum YUM

Fruit Crisp by annbumbly
Beginnings of a  blueberry-nectarine crisp
What a treat!

My mom is the quintessential fruit crisp and pie maker, bar none. Give her some fruit and quick as can be, we'll be treated to a delicious dessert! I asked her to please write down how she makes her crisps and pies because, of course, she'd never done that (true T'nGG). Instead, she dictated directions to me which I wrote down for our family. (Family recipes are most important. Remember that!) Follow her directions and you will have created one of the most delicious and memorable desserts you've ever bitten into. YUM! (Pie fixin's to come.)

The T'nG (in mom's words):

Heat oven to 400º.

The Filling: Put your fruit of choice in an au gratin dish. Fill until about 1/2" from the top. (This could be unpeeled fresh peaches, nectarines, Italian prune plumbs or other plums. Or apples, fresh blackberries, blueberries, hulled bing cherries, tart cherries (adjust sugar amount accordingly for tartness), a mixture of berries and slices (see above), or rhubarb, rhubarb with strawberries; whatever you like. You can also use frozen fruit. (Citrus isn't appropriate for this.)

The Topping: A rounded 2/3 C. flour, 2/3 C. sugar, 1/2 C. regular oatmeal (not steel-cut). If an apple crisp - add cinnamon; peach or nectarine - add nutmeg; cherry - add almond extract. Put all in a food processor and pulse enough to mix. Add 1/2 - 1 stick cold butter that's been cut into chunks and added a chunk at a time. Pulse until you have a coarse meal. (You can also do this with two forks or a pastry cutter if no food processor is available.) Spread that over the top of the fruit so all is covered. Bake at 400º for about 45 minutes. It's done when the crust on top is getting golden brown and the fruit juices are bubbling up from below. 

You can use any size oven-proof dish, just add amount of fruit and topping accordingly. The larger the dish, the longer it will take to bake. Delicious!

This is the very best baked an hour or two before you want to serve it, so it hot! It's excellent with a dollop of creme fraiche or excellent vanilla ice cream on it. 

P.S. - It's really true - you don't ever need to bother to peel the fruit. Absolutely not necessary - you'll never know the peel is there as it just melts away during baking. Plus, think of the fiber....well, maybe don't think of that....


Just out-of-the-oven peach (no blueberries this time) crisp

~~~

YUM!

till we feast again!
xoabb

Saturday, July 7, 2012

Clams on the Grill! Corn in the Skillet!

IMG_0005 by annbumbly
Cousins grillin' up some scrumptious eats

~

Fresh corn-off-the-cob = in the skillet goodness!

The hubs played in a charity golf tournament the other day and won one of the door prizes - a bushel of fresh Long Island Sound clams (actually he won an embarrassing number of door prizes; I've been visiting a lot of restaurants and wine shops of late). While this is one of our favorite foods, a bushel of clams is a lot more clams than two folks could possibly consume. Good thing we have our Sunday Family Dinner tradition! We gathered, they grilled and we all moved directly toward a food coma. SO good! The clams started our meal and were followed by the corn, grilled assorted sausages and a big green salad. So very good!

The T'nG:

For the clams: 

Clams
butter, melted (LOTS) keep it warm (clarified butter is nice)

Store the clams either on ice in a cooler or in the refrigerator in an open bag until ready to use. About 40 minutes before grilling, place clams in a colander and rinse them, then put them in a big bowl (or kitchen sink) and cover them with cold tap water. Sprinkle corn flour or black pepper into the water and give all a gentle stir. Leave the clams - do not stir - in the water for 20 minutes. After that time is up, gently lift the clams individually, or a few at a time, out of the water. Clean anything ugly off the shell, rinse and put into a lasagna-like pan. (It's better to lift them out one by one as just dumping them into the colander would also dump the sand back on top of the clams. Not good.) Place clams on your prepared charcoal/gas grill, see above, and grill with the lid closed until they pop open. As they pop open, place clams on a platter or another lasagna-like pan. Serve. If you have a ginormous amount of clams like we did, use two serving pans and serve the clams in shifts. Delicious!  

For the corn: 

Corn, use frozen, fresh cut off the cob, or in our case, left-over grilled corn cut off the cob
butter 
cayenne and fresh ground black pepper
sea salt

Warm butter in a large skillet (and while I almost always use an iron skillet, for some reason I didn't when cooking the corn that night - what's up with that??). Add corn to the skillet and stir. Let corn sauté, stirring often until it begins to caramelize. Be sure to scrape the bottom of your skillet to get all the lovely brown bits that will be forming there. Add cayenne and black pepper to taste as well as salt. You want it to have a bite, but not enough to take your head off. You can do all of this ahead (takes about 30 minutes for good caramelization) and just reheat right before serving. Wonderful!

~~~

YUM!

'till we feast again!
xoabb

Tuesday, June 26, 2012

Mustard Greens in a Skillet

You'd never know this was once a very large amount of mustard greens!
They cook down even more than spinach does!

That's my Calphalon 12" - 5 quart sauté pan I found at a yard sale for $1.00!

Julie and I ventured up to the Greenfield Hill farmers' market in Fairfield, CT last Saturday. We tend to go there more than the markets closer to home as the vendors there have top-notch products, a pizza truck and usually a pasta truck are in attendance, and, to top things off, our good friend Jane works at the liquor store and they have a wine tasting of top-notch wines every Saturday afternoon. This time around, I came home with some of my favorite Italian flat beans, some beautiful fresh-from-the-hen eggs - brown, white and a beautiful blue one, a huge head of red leaf lettuce, and a lot of other veggies. I was getting ready to pay for some of the veggies when, out of the corner of my eye I spotted a big mess of mustard greens. I picked them up and asked the price. The two guys checking me out just looked at me and shrugged, which made no sense until a lady came over and informed me those greens were hers she'd gotten at another one of the stands. I quickly found out which stand and bee-lined over to get my own mess. There was one mess left and the guy said they'd been his most popular veggie this week and he'd only brought them on a whim because he wasn't sure anyone would know what to do with them. Being my mother's child, I did know what to do. And that was, pick up the phone and call mom to see how to best cook 'em up as greens are a regular on her dinner table. Alas, she wasn't home the night we had them, so Miss Lauren, who joined us for dinner that night, and I guessed what to do, based on how I'd watched mom do greens in the past. They were delicious! It was Lauren's idea to add the vinegar to cut the natural bitterness and that sent the whole dish to over-the-top yumminess! (We though of adding a can of cannellini beans - love beans and greens sautéed together - but decided not to this time as we were also having skillet corn with our meal.) Hope you try this! Mustard greens are quite mustardy-tart and flavorful - delicious!

The T'nG: 

1 - 2 bunches mustard greens (add any greens you like), washed thoroughly
garlic cloves or an onion, sliced
olive oil to coat bottom f skillet
black pepper, fresh ground
salt if desired
a splash of red wine vinegar 

I cannot stress enough the importance of washing the greens very very thoroughly. Just keep in mind as you're washing and looking at each leaf, front and back, that slugs love those leaves, too! Let rinse water remain on the leaves, don't spin or shake dry. After the leaves and flowers are washed, strip the leaves from the tough lower stems and cut the stems of the flowers where they begin to get tough - much like snapping an asparagus stem off at the tough spot. Gather all the leaves together length-wise and then ribbon cut them into 1/2" - 1" wide strips. Heat oil until just smoking, throw in the garlic (what we used) and sauté for a minute to release its flavor. Throw in the greens and sauté, stirring to get all of them evenly cooked. Take off the heat and season with pepper, salt and splashes of red wine. Taste and correct seasonings. Delicious served warm or at room temperature. 


~


Below is a photo (borrowed, source noted, as I totally forgot to take that shot myself) of what mustard greens look like before cooking. It was amazing how much they cooked down! That skillet was entirely covered before they wilted down to what you see there. After they were cooked, the greens fit perfectly in a cereal-sized bowl. Next time I'll know to get two!

mustard greens washed and ready to be chopped, flowers and all
photo source


~~~

YUM!

'till we feast again! 
xoabb

Friday, June 22, 2012

Annnnd We Have...Another Cake from the Non-Baker!

IMG_0001 by annbumbly
Sawdust Cake
Photo taken w/cake resting on the grass just before said cake and I got into the car to go to bridge night.
It's all Lauren's fault. Totally and completely. She knows I don't bake, but based on the fact I made that other cake that turned out to be a yummy success, she sent me the following email: "Hey Baker Lady. Bake this!" Never one to shy away from a challenge, and knowing bridge night was next evening and I'd have a captive audience of ladies that love their sweets, I told Miss LaLa her cake was forthcoming! Though I call this ~Sawdust Cake~, it's actually called Cornmeal Buttermilk Cake. Lauren found the recipe on the Tasty Kitchen website and the gal that posted it there got the recipe from Kelly's website. Whatever, it is one delicious cake!
Both the previous recipes called for it to be baked as a layer cake. Because I was taking it with me, I baked it in a 9 x 13 pan that had a handy dandy carrying cover (um...I also have no round cake pans). Don't think that made a bit of difference to the wonderful flavor! 
This is a very sturdy cake, quite different from the texture of most, but delicious none the less. Enjoy!

The Decidedly Not T'nG: (oh dear, this decidedly not T'nG cannot become a habit!!):

For the cake: 
1 3/4 cup all-purpose flour
1/3 cup yellow cornmeal
1 teaspoon baking powder
1/2 teaspoon baking soda
1/2 teaspoon salt
1 cup sugar
1/2 cup packed brown sugar
8 tablespoons unsalted butter, melted
1 cup buttermilk
1 teaspoon vanilla
4 eggs at room temp.

Heat oven to 350º and spray a 9 x 13 pan with non-stick cooking spray. In a large bowl sift together the flour, cornmeal, baking powder and soda, salt, sugar and brown sugar. In a medium bowl whisk together the butter, buttermilk, vanilla and eggs until well combined. 
Pour the wet ingredients into the dry and mix until there are no large lumps of flour remaining. A few small lumps are fine. Pour the batter into the pan and bake for 25 - 30 minutes, or until the cake pulls away from the side of the pan and a stuck-in toothpick come out clean. Cool in the pan on a rack. (I waited till it was cool, covered it and refrigerated it overnight. It was iced the next afternoon.)

For the Frosting:
4 oz. semi-sweet chocolate, melted (follow box directions)
2 sticks butter at room temperature
1 teaspoon vanilla
1/4 cup cocoa powder
4 1/2 - 5 cups powdered sugar
1/3+ buttermilk

In a large bowl, cream together the melted chocolate and butter until smooth and creamy. Add in the vanilla, cocoa powder and powdered sugar (powdered sugar a bit at a time) and begin mixing. Slowly add in the buttermilk until the frosting reaches your desired spreading consistency. If the frosting is stiff (mine was), add a but more buttermilk until the right consistency is reached. Frost the cake. 
(Note: I knew this was going to be too much frosting for a sheet cake, but there really is no way to halve this recipe. So...I made the whole amount and told my hubs there were left-over and to enjoy. Let's just say, he took me at my word, (though I did throw some away. Not much, but some.)
A slice after the icing had melted in our 98º day, but you can see the denseness!

~~~

YUM!

'till we feast again!
xoabb

Wednesday, June 13, 2012

Fresh ~Pickled~ Cucumbers

Fresh ~Pickled~ Cucumbers by annbumbly
Old Fashioned ~Pickled~ Fresh Cucumbers
This wonderful dish has been part of my families' heritage since, well, forever. I can't remember a time this wasn't part of our family summer gatherings, (I am now old enough that when I was young, we really did eat seasonally as out-of-season produce was awful and prohibitively expensive. When my mom was growing up, out-of-season produce was simply non-existent, so this was something her family enjoyed as long as the cucumbers were being gathered from the family garden) and it's a delicious addition to any summer gathering!
Now that we have the fancy-schmancy hydroponically-grown "English" cucumbers, this dish is possible all year round! A good thing, me thinks! (If you use regular cucumbers, do peel them - the skin can be tough, and the wax put on them is just yukky.) Make this tomorrow, folks! You'll be happy you did!

The T'nG:

English cucumbers, washed, peeled with skin stripes (see above) and sliced
cider vinegar
dill, fresh is best, chopped (dried can be substituted, but it's not as good)
fresh ground black pepper
ice cubes
kosher salt


Put the cucumber slices in a bowl and just cover with the cider vinegar. Sprinkle dill over all, along with fresh ground pepper. Stir well. Cover the top with ice cubes and then sprinkle kosher salt on the ice cubes. Refrigerate until ready to serve.   For serving, a slotted spoon works well. 

~~~


YUM!

'till we feast again!
xoabb

Monday, June 4, 2012

Auntie M's Chocolate Picnic Cake (certainly NOT a T'nG)

Chocolate "Picnic" Cake by annbumbly
Aunt Madeline and Cousin Louise surely knew what they were doing!
A small note....though I'm not a measuring kind of gal, I know enough about cooking to understand that when you bake, it's all about the measuring. The recipes below are ALL about measuring and NOTHING about throwing and going. I don't do the measuring kind of cooking/baking often because I'm not very good at it, but it was my turn to do dessert, so I figured, what the heck, let's try this for the very first time! Guess what? The ~measured~ results were quite tasty! Enjoy!

The hubs and I have been part of a Gourmet Group/Club for the last 11+ years. We've had the best time, and have established long-term friendships with all in the group. All of us are good (being a relative term) cooks, and have improved on that status over the years because of our cooking endeavors for the group. Sometimes we take it easy, as we did tonight with our summer barbecue theme, and other times we choose a cookbook like ~The One & Only Palmilla~ by Charlie Trotter to really push our limits.  
Our theme for tonight's Gourmet Group gathering was Summer Barbecue, and I was the dessert person - something I really don't relish. At all.
So I volunteered to do something I've never ever done before in my life. I volunteered to make a chocolate cake. From scratch. I am not a baker, and certainly not a cake baker! But old dogs can learn new tricks....yes??? 
Jane, the gal I work with and who I share all my woes with, immediately took sympathy on me and said she would dig up some of her old fail-proof (key words there) family chocolate cake recipes for me to choose from. Oh my! I'm so glad she did! The cake recipe is from either her or her mom's Aunt Madeline and the icing recipe is from her or her mom's cousin Louise. Obviously there's been a whole lotta good cookin' going on in Jane's family! 

The T'nG Recipe:

Aunt Madeline's Picnic Chocolate Cake

4 squares baking (bitter) chocolate (bitter chocolate - I didn't realize what that was and had bought semi-sweet chocolate squares. After a check on google, I found that if you mix 3 tablespoons cocoa powder (I used Dutch cocoa powder) with 1 tablespoon canola oil, it's the same as 1 baking square, so I did that (x's 4), but still heated it over the hot water)
1/2 cup butter
2 cups sugar
2 eggs
2 2/3 cup sifted cake flour
2 teaspoons baking powder
1/2 teaspoons salt
2 cups buttermilk
2 teaspoons baking soda
1 teaspoon vanilla

Preheat oven to 350º. Grease and flour a 13 x 9 x 2 pan. Melt chocolate over hot but not boiling water in a double boiler or in a bowl set over a pot. Cream the butter and add sugar gradually; cream until light and fluffy. Add the eggs, one at a time, and beat well after each addition. Sift the cake flour, baking powder and salt together. Stir baking soda into the butter milk. Add cake flour mixture and buttermilk alternately to the creamed ingredients. Blend in the vanilla and melted chocolate and mix thoroughly. Pour into your prepared pan. Bake about 45 minutes, or until done. Check doneness with a toothpick - when the stuck-in toothpick comes out clean, the cake is done! Take out of the oven and set pan on a rack to cool.


Cousin Louise's Fluffy White Icing

Combine in a bowl/top of a double boiler: 
2 egg whites
3/4 cup white sugar
1/3 cup light corn syrup
2 tablespoons water
1/4 teaspoons cream of tartar
1/4 teaspoons salt

Place over a pot of rapidly boiling water, and beat with your mixer until the mixture stand in peaks -  about 7 - 10 minutes. Remove from heat and add 2 teaspoons vanilla and continue to beat until the mixture is thick enough to spread. Excess frosting (there wasn't any) can be stored in a jar in the refrigerator. 


~~~

YUM!

'till we feast again!
xoabb

Tuesday, May 29, 2012

Iron Skillet Asparagus w/Garlic

Asparagus w/Garlic by annbumbly 
Just before it goes on the dinner table
Asparagus and garlic. Two of my most favorite flavors in the whole wide world. And when they're cooked together? Perfection is mine! Many many years ago the hubs and I ate dinner at a friend's home and she included this in the meal we had. I was smitten! Totally and completely smitten! And also more than a little irritated that I hadn't figured out this taste sensation myself. It is so easy! Kudos to my old friend, Maria, for bringing this into my culinary repertoire. 

What a perfect spring-time dish this is - the height of asparagus season!


Asparagus, thick or thin spears, trimmed of their tough ends
2 - 4 cloves garlic, thinly sliced
olive oil (I prefer EVOO)
salt & pepper to taste
parmesan or romano cheese, fresh grated (optional)
iron skillet (or other skillet) with a lid


Wash trimmed asparagus, leaving the water on. Smear the iron skillet (other skillets will do - I don't like using non-sticks as the heats is so high) with olive oil and heat to medium high to high. Throw the garlic slices in the pan and saute, stirring constantly till garlic is beginning to turn golden. With the lid at the ready, throw the asparagus spear in the skillet and quickly slap on the lid. Shake all violently for a minute or two, until the sizzling subsides. If your spears are quite thick, you might want to shake a few more minutes. Take lid off and, add salt and fresh ground pepper and continue to sautee until the asparagus are done to your liking - another 5 to 10 minutes. (Our family likes them best when they're cooked over a higher heat and the spears themselves are beginning to brown.) Put asparagus on a platter (you can leave it in the skillet, but they will continue to cook from the residual heat of the skillet), sprinkle with the cheese if desired and serve.

~~~

Yum!

'till we feast again!
xoabb

Saturday, May 19, 2012

Grilled Artichokes ala Jules

Grilled Artichokes ala Jules by annbumbly
Fresh off the grill
photo courtesy of Julie 

Of late, our Whole Foods Market has had the most beautiful - and ginormous - artichokes. They're called ~long-stem artichokes~; something I'd never heard of or had seen. They were also on sale (hate paying $4.00++ for them), so I picked some up for our din-din. Steamed them the old fashioned fat-filled way (because of the butter, people, the butter, not the artichoke), and they were delicious. And so huge, they were shared and we all had more than enough to satisfy our bellies.

Of course, cousin Jules had to have her way with the long-stem 'chokes she bought. Needless to say, she created another culinary masterpiece (she's good at that). They were over-the-top delicious! And on top of that? They were healthy! Whoda thunk an artichoke could actually not be drowned in butter or hollandaise and still be delicious??

The T'nG:

long-stem artichokes (regular ones will do as well)
olive oil
lemon juice
lemon zest
fresh ground black pepper
salt to taste
shredded romano/parmesan cheese

Steam/boil the artichokes until just done. (Julie cut off the long stems, trimmed off the tough outer layers with a vegetable peeler and steamed them along with the whole artichokes.) Let them cool enough so you can handle them without burning the heck out of yourself. When cool, cut the artichokes in half. With a knife and spoon remove the choke (the inedible fibrous middle of the artichoke). In a separate bowl, mix together the olive oil, lemon juice and zest, pepper, salt and the parmesan cheese (amounts are up to you - yup, a T'nG at its finest!). Brush the mixture all over the halved 'chokes being sure to get marinade between the leaves. When you're ready, heat the grill to a high heat. Place the artichoke halves on the grill, cut side down. Grill until it's beginning to brown (see above), turn over, sprinkle the top with the cheese, close the grill and cook until cheese is beginning to melt and the bottom is beginning to brown. Serve hot off the grill or at room temperature. If there are leftovers (doubtful) rewarm them in the oven.

~~~

Yum!

'till we feast again!
xoabb

Wednesday, May 16, 2012

A Spring-Time Dinner

Untitled by annbumbly
Spring-time table setting.

My mom is the quintessential food gal (read self-taught chef). Not only is the food she creates over the top, the table settings - and everything - is as well. All is just so, from the plates to the linens to the flowers. On top of that, the menus she comes up with are perfection! Consider this (and this is a ~simple~ any week night dinner):

Broiled Herbed Salmon

Salmon fillet - weight depending on number served - below, for four, (one pound)
juice of one lemon, divided
lemon zest
1/4 cup mayonnaise
fresh chopped dill and parsley
black pepper, fresh grated

Rinse salmon fillet and pat dry. Squeeze half the lemon on the fillet. Mix the mayonnaise with the herbs, pepper some of the lemon zest, and other half of the lemon juices. Slice the fillet into individual servings. Coat the salmon with the mayonnaise mixture. Broil until the salmon flakes easily; about 6 minutes. Serve with lemon halves on the side.

Pasta w/Veggies

spagetti, fettucini, whatever shape, cooked to package directions (keep warm)
This night, the vegetables we used were: 

Scallions, sliced diagonally in 1" pieces
garlic, sliced thinly length-wise
red pepper, diced
grape tomatoes, quartered
asparagus, sliced diagonally in 1" pieces
baby spinach leaves
lemon zest
olive oil
salt & pepper to taste

Heat olive oil in a sauté pan. Add the scallions and garlic and cook for 2 minutes or so. Add the red pepper and cook for an additional 2 minutes or so. Add the tomatoes, asparagus, lemon zest and spinach and sauté until done. Turn off heat and WAIT until it's time to serve. You might have to reheat for a minute or so. 

Salad with Fruit

salad greens
pineapple chunks
strawberry slices
pear chunks
walnut pieces
lemon zest
red wine vinegar
olive oil
salt & pepper


Clean the salad greens (I prefer red leaf lettuce - anything will work, tho avoid iceberg for this). In a salad bowl, add the lettuce and all the extras. Just before serving, splash with the vinegar, oil, salt and pepper. Toss, taste for seasonings, correct, and serve! 


The beginnings of the veggie sauté 


 The salmon just before it goes under the broiler 
(notice it's cut into serving pieces).

 The micro-planed lemon skin - that goes on just about everything!


The composed salad before it's tossed


The veggies as they're sautéing 


sautéd veggies just before adding to the pasta


The fabulous meal - salad is just out of photo range...

YUM!

'till we feast again!
xoabb

Tuesday, May 8, 2012

Shrimp & Bay Scallop...umm...Scampi?

Shrimp & Bay Scallop...umm...Scampi? by annbumbly
Shrimp & Bay Scallop....well....Scampi?
My entire grocery shopping list is totally and completely dependent on what is on sale (and, no, this doesn't seem to save me any money...dammit!). This week, much to my shock, jumbo shrimp were on sale for half their usual hefty price. So into the cart 2 lbs. went! Must say, I've never been very good with shrimp as we didn't have it a lot growing up as dad was allergic to it, and most of my basic cooking I learned from the years I lived at home. 
The only way I ever remembered having shrimp for dinner was boiled with seasonings, then thrown in the middle of the table (on a cookie sheet of course) and peeled by those of us who were enjoying the meal (only served when daddy was out of town). There probably was dipping sauce...but I really don't remember. DO remember what a wonderful meal it always was! 
At work today, I found Emeril's shrimp scampi recipe on foodnetwork.com so thought I'd try it. Got home, started making the recipe (no, I generally don't read through a recipe and pre-measure/prep everything, nor do I Clean-As-I-Go, much to my daughters' irritation) and realized it didn't really fit.  (Who the hell has the time to make ~shrimp stock~, whatever that is, an hour before dinner???) Here's what happened:

The T'nG:

butter, or, if you want to be healthy, olive oil
1 1/2 lbs. jumbo shrimp
1 lb. bay scallops
4 or 5 finely chopped garlic cloves
1 - 2 lemons, juiced 
at least 3/4 cup white wine (I used Sauvignon Blanc)
(a bit of sugar if mix is too sour - optional)
about a 1/2 cup half & half cream
2 Tablespoons chopped fresh parsley plus more for garnish
2 Tablespoons cold butter
Basmati rice, cooked to package directions
Steamed broccoli (what was our side dish)

Clean, devein and season shrimp well with salt and pepper. Heat a large sauté skillet over medium high heat. When pan is hot, add enough butter/oil to lightly coat pan. Add the shrimp in one layer and sauté until just turning pink, turn over and sauté a bit longer, till pink but not cooked through. Turn down the heat and add a bit more oil/butter and gently sauté the garlic for about a minute. Add the wine and lemon juice and set aside. In another skillet, heat it over medium high heat and warm up a bit more canola oil. Throw the scallops in the pan and cook until they begin to release their juices. When they've done that, drain them in a colander over the skillet with the garlic and wine so their juices all combine. Set the scallops aside. Bring the garlic/wine/lemon pan back to the heat, bring to a gentle simmer and reduce to at least half. After the alcohol has evaporated off, taste and if it's too tart, add a sprinkling of sugar. Add the cream and when that's warm, throw in the shrimp, scallops, parsley and 2 tablespoons butter. Heat through. Throw on more parsley for garnish and serve.
We served it over the rice with broccoli on the side. 


~~~

YUM!

'till we feast again!
xoabb

Sunday, May 6, 2012

I'll have the Spatchcock Chicken, please

Carving the Spatchcock Chicken by annbumbly
My dad carving our spatchcock chicken - he's one mean bird carver!
My mom, a really really good cook/kitchen general/chef, started roasting spatchcocked chickens about a year ago and now won't do roasted chickens any other way! I wholeheartedly agree! They are beyond perfection!
Spatchcock means you cut out the backbone of the bird and break the beast bone so the chicken (or turkey/quail/squab) lies flat. This allows all the skin to uniformly brown and both the breasts and thighs be done at the same time. Results? Delicious! 
When she first started roasting chickens this way, she'd first put 1/4" slices of onions in the pan with slices of lemons on top for the chicken's "trivet". Now she uses a mandolin to very very thinly slice the onions then the lemons for the trivet. What a difference! These onion & lemon slices cook to the point that they are falling apart and are just delicious as a side to serve over the top of the chicken. I'm tellin' ya, once you spatchcock, you won't go back! 
Mom also made a big mess of greens and beans to serve with our spatchcock chicken (recipe follows). That particular night we had a mix of mustard greens, kale and collard. Really doesn't matter what greens you use, or what combination, it's all so very good! In the past I've always used just escarole because it's the one green that didn't scare me, but now the sky's the limit! I'm willing to try any combination of those gorgeous greens! (See below greens recipe for more photos.)

The Spatchcock Chicken T'nG (in mom's words):

Preheat oven to 425º.

1 chicken 2 1/2 lbs. to no more than 3 1/2 lbs. (get to know your butcher - most chickens in the case are much larger than this. If you ask your butcher for one of their uncooked rotisserie chickens, you'll get a good one!)

Remove any excess fat and skin. With poultry shears or Joyce Chen clippers, cut along both sides of the backbone, removing it. I find it easier to cut through the bones if you first cut through the skin along each side of the spine. Save the backbone to make chicken stock. (Start a bag and store it in the freezer till you have enough to make stock.) Place the bird, breast side up, on a flat surface and push down on the breast bone to break it and flatten (spatchcock) it.  

Lightly coat a shallow baking dish with olive oil. To that add: 

1 large onion sliced very thinly - use a mandolin
1 lemon, sliced very thinly

Mix the lemon with the onion and spread in the baking dish(1). Add to that fresh thyme sprigs, fresh rosemary, fresh sage leaves; any herbs you like or have on hand - be sure to evenly scatter over your onion and lemon slices(1). Set the bird on top and bring the legs around so they fit flat and just under the breast (see above, or click on above photo to see more pics of the process), and also below pics  2&3). Lightly coat the chicken with olive oil and then season with more herbs, red pepper flakes/cayenne, salt, black pepper, and any other seasoning of your choice(4). Squeeze juice of a lemon over the bird. 

Bake for about an hour or until thermometer reads 165º (chicken will keep "cooking" after you take it out of the oven for some minutes). If it's browning too quickly, reduce the oven temp to 375º. Let chicken rest for 5 - 10 minutes before carving(5).

Serve pan juices with all the onion and lemon bits with the chicken. Encourage folks to put this strange looking stuff on their chicken serving. And be sure to save any left over pan juices after dinner to freeze for future sauces, gravies or soups. 


~~

Beans & Greens
(last photo, below)

The B&G T'nG (in mom's words):

2 tablespoons olive oil
2 cloves garlic, smashed and roughly chopped
1/4 teaspoon crushed red pepper
1 medium onion, chopped
1 1/2 lb. kale, rinsed and cut into 1" sliced, crosswise
1 lemon, juiced
salt & pepper to taste
2 15 oz. cans cannellini/white beans, rinsed well
EVOO for drizzling - optional

Heat oil in a large sauté pan and, when hot, add the onion, garlic and crushed red pepper. Sauté until the garlic is fragrant; about 30 seconds. Add the kale and season with salt and pepper. Squeeze the lemon over the kale and stir. Fold in the beans, cover and simmer until the kale is wilted and cooked through, about 20 minutes. To serve, transfer to a serving dish and drizzle with EVOO.

Mom writes: "This can be altered to serve 2 people, and remember both of these recipes are just a starting point! Different greens, other beans or whatever. Herbs are up to you as well."

~~
 1

2

3

4

4

5

Beans & Greens

~~~


YUM!

'till we feast again!
xoabb