Monday, July 9, 2012

Any Fruit Crisp - Mum Bum YUM

Fruit Crisp by annbumbly
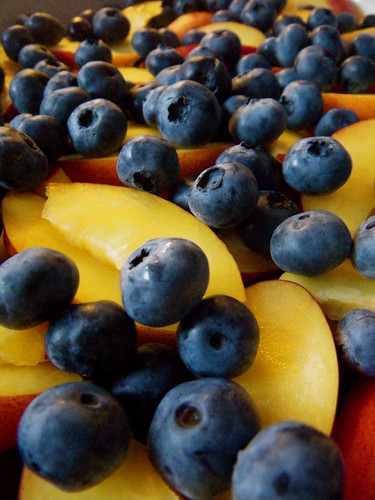
Beginnings of a  blueberry-nectarine crisp
What a treat!

My mom is the quintessential fruit crisp and pie maker, bar none. Give her some fruit and quick as can be, we'll be treated to a delicious dessert! I asked her to please write down how she makes her crisps and pies because, of course, she'd never done that (true T'nGG). Instead, she dictated directions to me which I wrote down for our family. (Family recipes are most important. Remember that!) Follow her directions and you will have created one of the most delicious and memorable desserts you've ever bitten into. YUM! (Pie fixin's to come.)

The T'nG (in mom's words):

Heat oven to 400º.

The Filling: Put your fruit of choice in an au gratin dish. Fill until about 1/2" from the top. (This could be unpeeled fresh peaches, nectarines, Italian prune plumbs or other plums. Or apples, fresh blackberries, blueberries, hulled bing cherries, tart cherries (adjust sugar amount accordingly for tartness), a mixture of berries and slices (see above), or rhubarb, rhubarb with strawberries; whatever you like. You can also use frozen fruit. (Citrus isn't appropriate for this.)

The Topping: A rounded 2/3 C. flour, 2/3 C. sugar, 1/2 C. regular oatmeal (not steel-cut). If an apple crisp - add cinnamon; peach or nectarine - add nutmeg; cherry - add almond extract. Put all in a food processor and pulse enough to mix. Add 1/2 - 1 stick cold butter that's been cut into chunks and added a chunk at a time. Pulse until you have a coarse meal. (You can also do this with two forks or a pastry cutter if no food processor is available.) Spread that over the top of the fruit so all is covered. Bake at 400º for about 45 minutes. It's done when the crust on top is getting golden brown and the fruit juices are bubbling up from below. 

You can use any size oven-proof dish, just add amount of fruit and topping accordingly. The larger the dish, the longer it will take to bake. Delicious!

This is the very best baked an hour or two before you want to serve it, so it hot! It's excellent with a dollop of creme fraiche or excellent vanilla ice cream on it. 

P.S. - It's really true - you don't ever need to bother to peel the fruit. Absolutely not necessary - you'll never know the peel is there as it just melts away during baking. Plus, think of the fiber....well, maybe don't think of that....


Just out-of-the-oven peach (no blueberries this time) crisp

~~~

YUM!

till we feast again!
xoabb

Saturday, July 7, 2012

Clams on the Grill! Corn in the Skillet!

IMG_0005 by annbumbly
Cousins grillin' up some scrumptious eats

~

Fresh corn-off-the-cob = in the skillet goodness!

The hubs played in a charity golf tournament the other day and won one of the door prizes - a bushel of fresh Long Island Sound clams (actually he won an embarrassing number of door prizes; I've been visiting a lot of restaurants and wine shops of late). While this is one of our favorite foods, a bushel of clams is a lot more clams than two folks could possibly consume. Good thing we have our Sunday Family Dinner tradition! We gathered, they grilled and we all moved directly toward a food coma. SO good! The clams started our meal and were followed by the corn, grilled assorted sausages and a big green salad. So very good!

The T'nG:

For the clams: 

Clams
butter, melted (LOTS) keep it warm (clarified butter is nice)

Store the clams either on ice in a cooler or in the refrigerator in an open bag until ready to use. About 40 minutes before grilling, place clams in a colander and rinse them, then put them in a big bowl (or kitchen sink) and cover them with cold tap water. Sprinkle corn flour or black pepper into the water and give all a gentle stir. Leave the clams - do not stir - in the water for 20 minutes. After that time is up, gently lift the clams individually, or a few at a time, out of the water. Clean anything ugly off the shell, rinse and put into a lasagna-like pan. (It's better to lift them out one by one as just dumping them into the colander would also dump the sand back on top of the clams. Not good.) Place clams on your prepared charcoal/gas grill, see above, and grill with the lid closed until they pop open. As they pop open, place clams on a platter or another lasagna-like pan. Serve. If you have a ginormous amount of clams like we did, use two serving pans and serve the clams in shifts. Delicious!  

For the corn: 

Corn, use frozen, fresh cut off the cob, or in our case, left-over grilled corn cut off the cob
butter 
cayenne and fresh ground black pepper
sea salt

Warm butter in a large skillet (and while I almost always use an iron skillet, for some reason I didn't when cooking the corn that night - what's up with that??). Add corn to the skillet and stir. Let corn sauté, stirring often until it begins to caramelize. Be sure to scrape the bottom of your skillet to get all the lovely brown bits that will be forming there. Add cayenne and black pepper to taste as well as salt. You want it to have a bite, but not enough to take your head off. You can do all of this ahead (takes about 30 minutes for good caramelization) and just reheat right before serving. Wonderful!

~~~

YUM!

'till we feast again!
xoabb