Showing posts with label veggies. Show all posts

Friday, July 15, 2016

A Spa Chicken Dish by the Incomparable Charlie Trotter

Steamed Chicken with Preserved Carrots, Peppers and Daikon with Marine Cider Vinaigrette

Mr. Trotter writes: "A perfectly steamed chicken breast is hard to beat. Here, I have coupled it with crisp vegetables flavored with marine cider vinaigrette and a touch of Thai fish sauce. If you are unable to find marine-flavored cider vinegar (cider vinegar seasoned with marine herbs and sea salt), any good-quality cider vinegar may be used."

(Photo by Julie)
Cousin Jules is one of the very best home chefs I know - she's right up there with my mom as far as her culinary expertise and imagination go. She, too, rarely follows recipes, and when she does, it's very hard for her not to get bored half way through the cooking process, as happened with the above dish when she made it (7.13.16), but persevere she did, and, boy were we all happy she did! All of Charlie Trotter's recipes are very detailed, lengthy with many ingredients and steps, and it's quite easy to get quite bored before you're anywhere near done. That said, the two recipes that we've (I made his mussels recipe) made from his Spa Cuisine: One & Only Palmilla cookbook were over the top and all kinds of wonderful! His subtle use of ingredients, (some of the combos which are just down-right weird), and how they combine are simply sublime! We're both anxious to test our patience further and try the other gems in his cookbook. This is so worth the time and trouble! Note: No where was there information on how to make marine-flavored cider vinegar, thought there were many articles on chefs that use it in their restaurants (google "marine cider vinegar") so Julie used plain Bragg cider vinegar and it worked just fine!

The so not a throw 'n go: 

For the marine cider vinaigrette:
2 T. olive oil
4 t. apple cider vinegar
4 t. chopped fresh cilantro (hate cilantro; I'd use parsley)
4 t. thinly sliced scallion
sea salt

For the chicken:
1 T. minced fresh ginger
2 cloves garlic, finely chopped
2 T. finely chopped lemongrass, from the bulb portion
2 boneless, skinless chicken breast halves
sea salt and freshly ground black pepper

For the vegetables:
1 C. peeled, julienned carrot, steamed (blanched)
1 red bell pepper, seeded and julienned
1/2 C. peeled julienned daikon radish (use regular radishes if you can't find daikon)
2 T. chopped fresh cilantro (again, hate cilantro; I'd use parsley)
1 t. black sesame seeds
1 t. white or toasted white sesame seeds
2 T. freshly squeezed lime juice
2 T. toasted sesame oil (Trader Joe's has a great one)
sea salt and fresh ground black pepper

For the red bell pepper puree (optional - it's not on the above plate):
2 T. chopped roasted red bell pepper (in a jar - Trader Joe's has a great one)
2 T. water
sea salt

To prepare the Marine Cider Vinaigrette:  Combine all ingredients in a bowl and whisk together. 

To prepare the chicken:  Combine the ginger, garlic and lemongrass in a small bowl. Season the chicken with 1/4 t. each salt and pepper and then place the chicken in the bottom of a bamboo or other steamer. Top the chicken breasts equally with the ginger mixture and set steamer over a pan of simmering water. Cover and steam for 12 to 15 minutes, or until the chicken is just cooked. Brush the ginger mixture off (at least the hard lemongrass pieces then thinly slice the chicken and toss with 1/2 the vinaigrette; use more vinaigrette if needed. 

To prepare the vegetables:  Combine the blanched carrot, bell pepper, daikon, cilantro (or parsley) and black and white sesame seed and toss to mix. In a separate bowl, whisk together the lime juice, fish sauce and sesame oil. Add this mixture to the vegetables and toss to mix. Season with salt and pepper. 

To prepare the (optional) red bell pepper puree:  Combine the roasted bell pepper and water in a blender and process until smooth. Pass through a fine-mesh sieve into a bowl and season lightly with salt. (Julie forgot to buy the red peppers so served it without - didn't hurt a thing!)


Assembly

Mound some of the vegetable mixture into the center of each plate, top with some of the chicken mixture, and then more of the vegetable mixture. Drizzle any juices from both mixtures around the plates and then spoon some of the pepper puree around the plate. 

Now eat up that deliciousness!


~~~

YUM!

'till we feast again! 
xoabb

Tuesday, June 26, 2012

Mustard Greens in a Skillet

You'd never know this was once a very large amount of mustard greens!
They cook down even more than spinach does!

That's my Calphalon 12" - 5 quart sauté pan I found at a yard sale for $1.00!

Julie and I ventured up to the Greenfield Hill farmers' market in Fairfield, CT last Saturday. We tend to go there more than the markets closer to home as the vendors there have top-notch products, a pizza truck and usually a pasta truck are in attendance, and, to top things off, our good friend Jane works at the liquor store and they have a wine tasting of top-notch wines every Saturday afternoon. This time around, I came home with some of my favorite Italian flat beans, some beautiful fresh-from-the-hen eggs - brown, white and a beautiful blue one, a huge head of red leaf lettuce, and a lot of other veggies. I was getting ready to pay for some of the veggies when, out of the corner of my eye I spotted a big mess of mustard greens. I picked them up and asked the price. The two guys checking me out just looked at me and shrugged, which made no sense until a lady came over and informed me those greens were hers she'd gotten at another one of the stands. I quickly found out which stand and bee-lined over to get my own mess. There was one mess left and the guy said they'd been his most popular veggie this week and he'd only brought them on a whim because he wasn't sure anyone would know what to do with them. Being my mother's child, I did know what to do. And that was, pick up the phone and call mom to see how to best cook 'em up as greens are a regular on her dinner table. Alas, she wasn't home the night we had them, so Miss Lauren, who joined us for dinner that night, and I guessed what to do, based on how I'd watched mom do greens in the past. They were delicious! It was Lauren's idea to add the vinegar to cut the natural bitterness and that sent the whole dish to over-the-top yumminess! (We though of adding a can of cannellini beans - love beans and greens sautéed together - but decided not to this time as we were also having skillet corn with our meal.) Hope you try this! Mustard greens are quite mustardy-tart and flavorful - delicious!

The T'nG: 

1 - 2 bunches mustard greens (add any greens you like), washed thoroughly
garlic cloves or an onion, sliced
olive oil to coat bottom f skillet
black pepper, fresh ground
salt if desired
a splash of red wine vinegar 

I cannot stress enough the importance of washing the greens very very thoroughly. Just keep in mind as you're washing and looking at each leaf, front and back, that slugs love those leaves, too! Let rinse water remain on the leaves, don't spin or shake dry. After the leaves and flowers are washed, strip the leaves from the tough lower stems and cut the stems of the flowers where they begin to get tough - much like snapping an asparagus stem off at the tough spot. Gather all the leaves together length-wise and then ribbon cut them into 1/2" - 1" wide strips. Heat oil until just smoking, throw in the garlic (what we used) and sauté for a minute to release its flavor. Throw in the greens and sauté, stirring to get all of them evenly cooked. Take off the heat and season with pepper, salt and splashes of red wine. Taste and correct seasonings. Delicious served warm or at room temperature. 


~


Below is a photo (borrowed, source noted, as I totally forgot to take that shot myself) of what mustard greens look like before cooking. It was amazing how much they cooked down! That skillet was entirely covered before they wilted down to what you see there. After they were cooked, the greens fit perfectly in a cereal-sized bowl. Next time I'll know to get two!

mustard greens washed and ready to be chopped, flowers and all
photo source


~~~

YUM!

'till we feast again! 
xoabb

Tuesday, May 29, 2012

Iron Skillet Asparagus w/Garlic

Asparagus w/Garlic by annbumbly 
Just before it goes on the dinner table
Asparagus and garlic. Two of my most favorite flavors in the whole wide world. And when they're cooked together? Perfection is mine! Many many years ago the hubs and I ate dinner at a friend's home and she included this in the meal we had. I was smitten! Totally and completely smitten! And also more than a little irritated that I hadn't figured out this taste sensation myself. It is so easy! Kudos to my old friend, Maria, for bringing this into my culinary repertoire. 

What a perfect spring-time dish this is - the height of asparagus season!


Asparagus, thick or thin spears, trimmed of their tough ends
2 - 4 cloves garlic, thinly sliced
olive oil (I prefer EVOO)
salt & pepper to taste
parmesan or romano cheese, fresh grated (optional)
iron skillet (or other skillet) with a lid


Wash trimmed asparagus, leaving the water on. Smear the iron skillet (other skillets will do - I don't like using non-sticks as the heats is so high) with olive oil and heat to medium high to high. Throw the garlic slices in the pan and saute, stirring constantly till garlic is beginning to turn golden. With the lid at the ready, throw the asparagus spear in the skillet and quickly slap on the lid. Shake all violently for a minute or two, until the sizzling subsides. If your spears are quite thick, you might want to shake a few more minutes. Take lid off and, add salt and fresh ground pepper and continue to sautee until the asparagus are done to your liking - another 5 to 10 minutes. (Our family likes them best when they're cooked over a higher heat and the spears themselves are beginning to brown.) Put asparagus on a platter (you can leave it in the skillet, but they will continue to cook from the residual heat of the skillet), sprinkle with the cheese if desired and serve.

~~~

Yum!

'till we feast again!
xoabb

Sunday, May 6, 2012

I'll have the Spatchcock Chicken, please

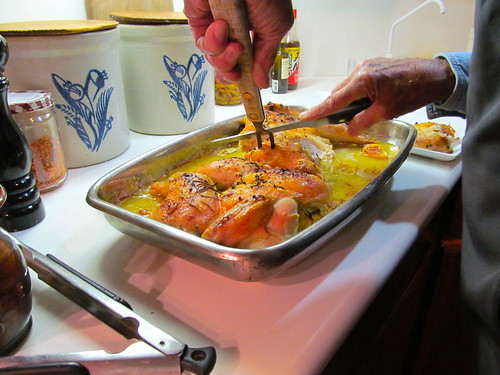
Carving the Spatchcock Chicken by annbumbly
My dad carving our spatchcock chicken - he's one mean bird carver!
My mom, a really really good cook/kitchen general/chef, started roasting spatchcocked chickens about a year ago and now won't do roasted chickens any other way! I wholeheartedly agree! They are beyond perfection!
Spatchcock means you cut out the backbone of the bird and break the beast bone so the chicken (or turkey/quail/squab) lies flat. This allows all the skin to uniformly brown and both the breasts and thighs be done at the same time. Results? Delicious! 
When she first started roasting chickens this way, she'd first put 1/4" slices of onions in the pan with slices of lemons on top for the chicken's "trivet". Now she uses a mandolin to very very thinly slice the onions then the lemons for the trivet. What a difference! These onion & lemon slices cook to the point that they are falling apart and are just delicious as a side to serve over the top of the chicken. I'm tellin' ya, once you spatchcock, you won't go back! 
Mom also made a big mess of greens and beans to serve with our spatchcock chicken (recipe follows). That particular night we had a mix of mustard greens, kale and collard. Really doesn't matter what greens you use, or what combination, it's all so very good! In the past I've always used just escarole because it's the one green that didn't scare me, but now the sky's the limit! I'm willing to try any combination of those gorgeous greens! (See below greens recipe for more photos.)

The Spatchcock Chicken T'nG (in mom's words):

Preheat oven to 425º.

1 chicken 2 1/2 lbs. to no more than 3 1/2 lbs. (get to know your butcher - most chickens in the case are much larger than this. If you ask your butcher for one of their uncooked rotisserie chickens, you'll get a good one!)

Remove any excess fat and skin. With poultry shears or Joyce Chen clippers, cut along both sides of the backbone, removing it. I find it easier to cut through the bones if you first cut through the skin along each side of the spine. Save the backbone to make chicken stock. (Start a bag and store it in the freezer till you have enough to make stock.) Place the bird, breast side up, on a flat surface and push down on the breast bone to break it and flatten (spatchcock) it.  

Lightly coat a shallow baking dish with olive oil. To that add: 

1 large onion sliced very thinly - use a mandolin
1 lemon, sliced very thinly

Mix the lemon with the onion and spread in the baking dish(1). Add to that fresh thyme sprigs, fresh rosemary, fresh sage leaves; any herbs you like or have on hand - be sure to evenly scatter over your onion and lemon slices(1). Set the bird on top and bring the legs around so they fit flat and just under the breast (see above, or click on above photo to see more pics of the process), and also below pics  2&3). Lightly coat the chicken with olive oil and then season with more herbs, red pepper flakes/cayenne, salt, black pepper, and any other seasoning of your choice(4). Squeeze juice of a lemon over the bird. 

Bake for about an hour or until thermometer reads 165º (chicken will keep "cooking" after you take it out of the oven for some minutes). If it's browning too quickly, reduce the oven temp to 375º. Let chicken rest for 5 - 10 minutes before carving(5).

Serve pan juices with all the onion and lemon bits with the chicken. Encourage folks to put this strange looking stuff on their chicken serving. And be sure to save any left over pan juices after dinner to freeze for future sauces, gravies or soups. 


~~

Beans & Greens
(last photo, below)

The B&G T'nG (in mom's words):

2 tablespoons olive oil
2 cloves garlic, smashed and roughly chopped
1/4 teaspoon crushed red pepper
1 medium onion, chopped
1 1/2 lb. kale, rinsed and cut into 1" sliced, crosswise
1 lemon, juiced
salt & pepper to taste
2 15 oz. cans cannellini/white beans, rinsed well
EVOO for drizzling - optional

Heat oil in a large sauté pan and, when hot, add the onion, garlic and crushed red pepper. Sauté until the garlic is fragrant; about 30 seconds. Add the kale and season with salt and pepper. Squeeze the lemon over the kale and stir. Fold in the beans, cover and simmer until the kale is wilted and cooked through, about 20 minutes. To serve, transfer to a serving dish and drizzle with EVOO.

Mom writes: "This can be altered to serve 2 people, and remember both of these recipes are just a starting point! Different greens, other beans or whatever. Herbs are up to you as well."

~~
 1

2

3

4

4

5

Beans & Greens

~~~


YUM!

'till we feast again!
xoabb

Wednesday, March 21, 2012

Thai Stir-Fry w/Rice Noodles

Thai Stir-fry w/Rice Noodles by annbumbly
Thai Stir-Fry with Rice Noodles
(First and foremost, I do apologize for my photographic skills - well, actually, lack thereof! Most of my pictures are taken around dinner time and, as anyone with even a rudimentary understanding of photography is aware of, unless you have good camera lighting equipment, natural dayligh,t and not just the camera's flash, is most definitely the only way to go! However, I will guarantee you that tho the pictures leave a lot to be desired, the food does not! What's found here is not only tried & true, but scrumptious - and much better tasting than any stinkin' photo looks like!)

Though our youngest daughter Brynnly has been in the food industry, both front and back of the house for, well, forever - and can she ever create one mean skillet of food - she's not the only good cook in our family. Eldest daughter Remy is turning out to be one mean cook as well. And it doesn't hurt that she spent the last year in Missouri cooking with her grandmother - who is one of the finest amateur chefs we've every known. Mom/Grandma Mary has always cooked healthfully, seasonally and innovatively long long before it became the only way to cook. I think the only processed food (if you can call it that) we ever had as children was orange-flavored Hi-C drink. Wonder if it's still made...
Now that Rem is home for the few weeks before she's off to her next adventure teaching in Haiti, she's more or less taken over my kitchen on the nights she's home. I thought I'd be bothered by this as I love to cook as well. Surprisingly, I'm not missin' cookin' one little bit! Rem's dad, on the other hand, isn't as keen on her cooking as she makes lots and lots of veggies, beans and whole grains. I've spoiled the man. Yes...there are Kraft Macaroni & Cheese boxes in our pantry (sigh). 
Remy threw the following together the other night using what she found in the pantry and fridge, and, yes, I really did happen to have rice noodles and canned unsweetened coconut milk in the pantry. I'm sure I was going to try some fancy-schmancy new recipe and then promptly talked myself out of it.  
We served it with chicken breasts that were pounded to be the same thickness, marinated for and hour and then char-grilled. 

~This one's a throw 'n go from start to finish!~


The Sauce: 
1 13.5 oz. can unsweetened coconut milk (not the one in the dairy case)
3 tablespoons+/- soy sauce
3 tablespoons+/- rice vinegar
3 tablespoons Whole Foods brand Thai curry peanut dry mix*

*if you can't get to Whole Foods, use a mixture of curry and cayenne pepper. I'm sure there is also garlic powder and tumeric in there as well. It is very spicy!

Mix all in bowl and set aside.

The noodles: 
1 package rice noodles - we used the "A Taste of Thai" brand thin flat noodles - cooked almost to package directions, but undercook just a bit. When done, drain and cover; set aside.

The veggie stir-fry:
While you can use any veggie combination that suits your fancy, below is what Rem used as it's what was in the fridge. Just remember to put your veggies in the pan from what needs to saute the longest to what cooks in the shortest amount of time. The first group of ingredients, the stir-fry base are a must; the second group, up to you.

The stir-fry base:
Extra Virgin Olive Oil, enough to coat the skillet plus extra if needed
4 - 8 cloves garlic, minced (amount to your taste - we love garlic!)
1" - 2" piece fresh ginger, peeled and grated (amount to your taste - we love ginger, too!)
juice of 1/2 lemon, more to taste
large onion, halved across, the each sliced in half again. Slice in slivers from top to bottom

Saute in the olive oil all of the above for 5 or so minutes over medium high heat. Then add your other veggies in the order of what will cook longest to shortest. Below is what Rem used:

The whatever you want veggie combo:
red pepper, sliced into strips
broccoli, cut into bite size pieces
asparagus, cut into 2" pieces
sugar snap and snow peas, stemmed
frozen peas

Add the veggies in order of the cooking time needed. Toward the end, add the sauce and cook until all is well blended, about 5 - 9 minutes. Add the pasta and stir again till all is blended. Taste and correct seasonings - a splash of soy sauce, a dash of Kosher salt, a touch more ginger, a splash of lemon juice; stir...then serve and enjoy!


~~~

YUM!

'till we feast again!
xoabb

Monday, February 27, 2012

Shepherd's Pie & Mary Poppins - Yes, They Go Together!

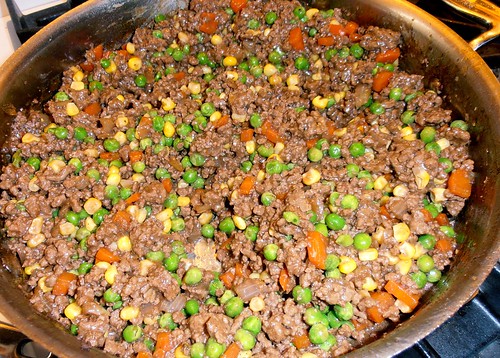
The Beginnings of Shepherd's Pie by annbumbly
Well, at least the beginnings of Shepherd's Pie
When our children were growing up, our lovely Sheila lived with us and was their ~Mary Poppins~. In the years since, tho no longer living with us, she has most definitely become family. She brought many wonderful things to our family, and one of the very best was her English cooking. No groans allowed, as we all quickly figured out that most English cooking, aside from waaaay over-cooked veggies, is really really delicious! Miss She introduced us to Scotch eggs, rice pudding, corned beef hash (whoa thunk that would be delicious!?!) and, drum roll please, Shepherd's Pie, to name a few. 
Much as I love it, I hadn't made Shepherd's Pie for years. Until recently. I had a taste for it about a month or two ago and decided it was time to recreate Sheila's masterpiece. It was wonderful and most amazingly, the hubs loved it too.  We've enjoyed it pretty regularly since then, to the point that when I made one for dinner for the Murray family who were returning from a ski trip, George (the hubs) said I couldn't take them one unless there was one for us as well. Happy to oblige!

Amounts to your preference:

1 1/2 or so lbs. ground beef
3 - 5 carrots, quartered length-wise then sliced 1/4" thick
1 medium onion chopped to size of the carrots
1 - 2 Tablespoons butter 
1 - 2 cups water
frozen corn, amount to your taste
frozen peas, amount to your taste
1 1/2 C. gravy (homemade or if you don't have that, a Better 'n Gravy or McCormick packet)
Worcestershire sauce to taste
salt and fresh ground pepper to taste
any other seasonings you might like

mashed potatoes
shredded cheddar cheese
paprika

Preheat oven to 350º. 
In an iron (preferably) skillet, brown the ground beef and then drain into a bowl so you can separate fat from any liquids. Set aside. Melt butter in same skillet and sauté the carrots and onions over medium high heat for 5 or so minutes. Pour the water over the carrots and onions just to cover and boil off the water. This tenderizes the carrots. Add beef, and any liquid left from draining it, back to the skillet and mix all together. Pour on the gravy to moisten it all - but don't add too much as you don't want it soupy. Add Worcestershire sauce, salt and paper and any other herbs you might like. Stir together well and taste to be sure seasonings are to your liking. Just before topping with the mashed potatoes, pour in desired amounts of corn and peas. I generally add about a cup of each. 
If you're not using the skillet you've just made everything in, pour mixture into a casserole dish. Top with mashed potatoes (recipe below), then sprinkle with the cheddar cheese and lightly with paprika. Bake until bubbly and hot through and through, about 30 - 45 minutes. This can be made ahead. Just be sure to bring it to room temp. before baking. 

Mashed Potatoes

Alrighty then...a bit of honesty is required here. Because of good advice I've gotten from cousin Julie, the last two times I've made Shepherd's Pie, I've cheated and bought already made mashed potatoes. Simply Potatoes and Country Crock are two brands. I heat them in the microwave according to package directions, then whip them with a little extra melted butter, salt and pepper and freshly grated nutmeg. Heck of a lot easier than making from scratch, and in this instance, no one can tell the difference! However, for those of you (hello Mom!) who are pure of heart, here's the from scratch way: 

3 - 5 lbs. russet potatoes, peeled, halved and cut in thirds
1 C. or so hot milk
1 stick butter, melted in milk
salt, fresh ground pepper and nutmeg to taste

Put potatoes in a pot with water just to cover. Boil until potatoes are done. Drain potatoes and put through a ricer (my preferred way). Mix in milk, butter and seasonings to taste. 

~~~

YUM!

'till we feast again! 
xoT'nGG