Showing posts with label entree. Show all posts

Wednesday, December 19, 2018

Mediterranean Baked Cod

an iron skillet filled with cod loveliness
Cod is one of our very favorite white fishes and I'm always looking for new ways to cook it. The on-line photos for this recipe were so good looking, I knew it was a must-try! Of course, the recipe was changed a bit, but most is true to the original, here. In my mind, nothing is better than sauteed cod (or most other sauteed fish), but the nice thing about this is it's finished off in the oven, which gives you time to finish up the rest of your meal. We served this with baked red potatoes and a pot of steamed french-style green beans. Delicious! 

For 2 folks:

4 medium sized red potatoes
french-cut green beans (frozen), amount to your taste
1 lb. or so cod fillet, cut into serving-size pieces, about 6 pieces
2 garlic cloves, minced (or equivalent garlic salt/powder to taste)
chopped fresh parsley
2 scallions, thinly sliced

4 T. fresh lemon juice or the equivalent 4 t. True Lemon Crystals*
3 T. extra virgin olive oil
3 T. unsalted butter

1/3 C. flour
1 t. ground coriander
1 t. sweet paprika
1/2 t. ground cumin (to taste)
salt to taste
white pepper to taste


Preheat oven to 425º. Place 2 red potatoes per person in the oven and bake for about 1/2 hour, until al dente. In the meantime, melt butter and mix with the olive oil and lemon juice/crystals in a flat bowl*. In a separate bowl, mix the flour and spices together. Pat the fillets dry. Dip fish in the butter/oil mixture and then in the flour mixture. Heat an additional 2 T. olive oil in an iron skillet, getting oil hot but not smokin' hot. Place fillet pieces in oil and saute until browned, about 2 minutes and then flip, sauteeing for an additional 2 or so minutes. Remove from heat. Add garlic to the left over butter/oil mixture, stir well and drizzle over the fish fillets. Bake in the oven for just 10 minutes. Remove from the oven and sprinkle the scallions and parsley over each fillet. Serve!

*If using True Lemon Crystals, use a stick blender to mix the butter, oil and True Lemon Crystals. After mixed well, pour back into the flat bowl. (Crystals won't mix in well enough if done by hand.)

*Ah, those loverly True Lemon Crystals...don't remember where I first heard about them, but, boy, am I glad I did! Now, I use True Lemon Crystals just about as much as I do fresh lemon juice. There is barely any difference in taste and it's so much easier to use than fresh lemons. There are some things it doesn't work as well for, such as in a salad dressing that uses only lemon juice and no other acidic liquid or if you need to all lemon zest to a dish for taste and looks. BUT, in a pinch, it's a god-send. AND for iced tea? Perfection! I buy it in the large jars you can get from Amazon and go through a jar++ just about every month. Follow this link to find it.


YUM!

'till we feast again! 
xoabb

Saturday, October 3, 2015

Iron Skillet Seared Swordfish

Iron Skillet-Seared Swordfish Fillet

I'm not a fan of a monochromatic dinner plate - boring to say the least! But, I only had yellow tomatoes, no red ones in the kitchen, so monochromatic it was! However, the finished meal was delicious...well at least the swordfish was! The onion rings were Alexa brand  - and very good - but I had nothing to do with those. The tomatoes were heirloom and there were only yellow ones left out of the box, so, yellow it was. The swordfish...well anything that's basically white to begin with, which will become golden when grilled or sauteed, so we have a monochormatic dinner plate. Not pretty, but damn good delicious! 

The Throw-n-Go:

1 lb. or so swordfish steak
2 TrueLemon packets (use fresh squeezed lemon juice if you must)
fresh ground Tellicherry pepper (if you're lucky to have those tellicherry pepper corns)
grape seed oil

salt to finish

Heat your iron skillet to just smoking. In the meantime, wash and dry the swordfish fillet. On each side, sprinkle one packet of TrueLemon, fresh ground pepper and a smear of grape seed oil. When your skillet is smokin' hot, slap the sworfish fillet down and let it sit there for about 6 minutes. Flip it and let it sear for another 4 or so minutes. Turn off the heat, put a lid over it and let it rest for up to 10 minutes. And then LOVE it!


~~~


YUM!


'till we feast again! 

xoabb

Sunday, March 30, 2014

Jambalaya

The beginnings of jambayala...YUM!

On March 29, 2014 cousin Julie and I threw an engagement party for our Miss Mary Shaw and her Richie. It was a Mardi Gras-themed party and I was tasked with making a NOLA jambalaya. Around 20 years ago, GB and I were at a party where the hosts served jambalaya. It was absolutely delicious so I'd asked them for the recipe, which they happily share. Fast-forward to the engagement party, and it was the very first time I ever used their recipe. I used the original recipe as a starting point and then ended up just doing my own thing - a throw-n-go type of thing for sure! Note: As basmati is my go-to rice, Frank's Original RedHot Sauce is our family's go-to hot sauce - nothing better out there! Just love cayenne pepper and can't stand Tabasco Sauce - don't like the pepper it's made out of.

Below is what I did, but, as it was for me with the original recipe, it's just a starting point - just throw and go! Delicious results will be in your future! (Below makes about 3 - 4 gallons; reduce amounts to suit your needs.)


olive oil
2.5 lb. package Costco AMYLU gluten-free Andouille sausage (or equivalent) 
6 lb. (approximate) package Costco boneless, skinless chicken breasts
3 large yellow onions, chopped
2 large yellow peppers, chopped
2 large green peppers, chopped
4 large red peppers, chopped
6 garlic cloves, coarsely minced
4 to 5 -14.5 oz.cans petite or regular diced tomatoes 
4 to 5++ 32 oz. boxes chicken stock (I used Whole Foods 365 organic brand)
parsley, chopped
salt
Frank’s Original RedHot Sauce (I used 1/2 of a 12 oz. bottle)
cayenne
~Cajun Seasonings~ by Penzey’s (Hand-mixed from: paprika, salt, celery, sugar, garlic, black pepper, onion, oregano, red pepper, caraway, dill, turmeric, cumin, bay, mace, cardamom, basil, marjoram, rosemary, and thyme. 
2 1/2 C. basmati rice, rinsed before cooking 
3 lbs. fresh shrimp, shelled, tail too (bay scallops could be used as well)
Cook the 2 1/2 C. rice in 5 c. water till just done.
Cut the sausage into 1/4” slices. Cut the chicken into chunks. Remove the tail from the shrimp and cut them in half.  
In a large skillet heat enough olive oil to smear the bottom of the skillet. Place sausage sliced in the skillet in a single layer and sauté until brown. Turn slices over and sauté until that side is brown. Do this in batches and throw done slices in a very large soup pot. (Mine is a 3-gallon All Clad soup pot that I absolutely adore - Thanks Kimmy!) Add the onions, peppers and garlic to the skillet (with more olive oil if necessary) and sauté until done. Do this in batches if necessary as you want the veggies to brown and not steam. When done, add veggies to the soup pot. 
Generously sprinkle the chicken with the Cajun seasonings and sauté in the skillet, adding more olive oil if needed. Do this in batches. When done, add chicken to the big pot. 
Add 4 of the 32 oz. boxes to the soup pot and also the rice. Bring pot to a boil and then simmer until the rice is done. Skim fat off if necessary. 
At this point, you can hold the jambalaya until 20 minutes before you’re ready to serve it. 
Add the shrimp about 15 minutes before you are eating, heat the soup, add more broth if it is too thick and serve. 

Crusty bread is a perfect side. Delicious!


~~~

YUM!


'till we feast again! 
xoabb
Wednesday, March 13, 2013

Chicken Marsala

Chicken Marsala-la-la! by annbumbly
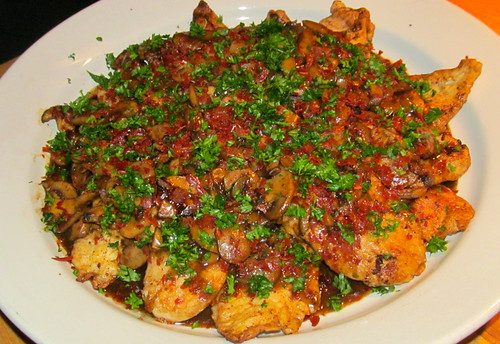
Chicken Marsala with Crumbled Crisp Pancetta
Above is one of our more delicious Sunday Family Dinner meals. Chicken Marsala with a secret ingredient added to it. No, those aren't diced tomatoes on top of the dish, it's oven crisped then crumbled pancetta. Talk about taking a delicious dish and making it absolutely awesome! Major yum factor going on here!


Chicken breasts, boneless, skinless and pounded to an even thickness

eggs seasoned with salt and pepper
flour (or gluten-free bread crumbs) seasoned well with thyme, salt and fresh-ground pepper
olive oil
butter
1 large box (or 2 small boxes) sliced mushrooms
2 - 3 tablespoons flour
3/4 of a bottle of marsala wine
1 cup or so chicken stock
pancetta rounds
parsley, chopped


Heat oven to 400. Place pancetta rounds on a parchment covered cookie sheet, put in oven and bake until pancetta is very crispy. Keep a close eye on it so it doesn't burn. Take out of oven and set aside.

Heat about 1/2" mixture of half oil and butter in a large (preferably) cast iron skillet over medium high. Dip chicken in the egg mixture and then the seasoned flour and place in the skillet. Do this in batches so the chicken pieces aren't crowded. (Be careful of the skillet temp as you don't want the delicious brown bits to burn and blacken.) As they are done, put them on an oven-proof platter and lightly cover with foil.
When all the chicken is done, add the mushrooms to the skillet, and more butter if necessary. Saute until the mushrooms have given up most of their moisture and are beginning to lightly brown. Add the flour at this point and cook for another 5 minutes or so, stirring constantly. Add the marsala and chicken stock and cook, whisking constantly, until the sauce has reduced by about half. Taste sauce to check for seasonings.
Pour sauce over the chicken, crumble the pancetta over the top and then top all with the parsley.


We served our Chicken Marsala with buttered egg noodles, baby peas and a green salad.


~~~

Yum!

'till we feast again!
xoabb

Saturday, July 7, 2012

Clams on the Grill! Corn in the Skillet!

IMG_0005 by annbumbly
Cousins grillin' up some scrumptious eats

~

Fresh corn-off-the-cob = in the skillet goodness!

The hubs played in a charity golf tournament the other day and won one of the door prizes - a bushel of fresh Long Island Sound clams (actually he won an embarrassing number of door prizes; I've been visiting a lot of restaurants and wine shops of late). While this is one of our favorite foods, a bushel of clams is a lot more clams than two folks could possibly consume. Good thing we have our Sunday Family Dinner tradition! We gathered, they grilled and we all moved directly toward a food coma. SO good! The clams started our meal and were followed by the corn, grilled assorted sausages and a big green salad. So very good!

The T'nG:

For the clams: 

Clams
butter, melted (LOTS) keep it warm (clarified butter is nice)

Store the clams either on ice in a cooler or in the refrigerator in an open bag until ready to use. About 40 minutes before grilling, place clams in a colander and rinse them, then put them in a big bowl (or kitchen sink) and cover them with cold tap water. Sprinkle corn flour or black pepper into the water and give all a gentle stir. Leave the clams - do not stir - in the water for 20 minutes. After that time is up, gently lift the clams individually, or a few at a time, out of the water. Clean anything ugly off the shell, rinse and put into a lasagna-like pan. (It's better to lift them out one by one as just dumping them into the colander would also dump the sand back on top of the clams. Not good.) Place clams on your prepared charcoal/gas grill, see above, and grill with the lid closed until they pop open. As they pop open, place clams on a platter or another lasagna-like pan. Serve. If you have a ginormous amount of clams like we did, use two serving pans and serve the clams in shifts. Delicious!  

For the corn: 

Corn, use frozen, fresh cut off the cob, or in our case, left-over grilled corn cut off the cob
butter 
cayenne and fresh ground black pepper
sea salt

Warm butter in a large skillet (and while I almost always use an iron skillet, for some reason I didn't when cooking the corn that night - what's up with that??). Add corn to the skillet and stir. Let corn sauté, stirring often until it begins to caramelize. Be sure to scrape the bottom of your skillet to get all the lovely brown bits that will be forming there. Add cayenne and black pepper to taste as well as salt. You want it to have a bite, but not enough to take your head off. You can do all of this ahead (takes about 30 minutes for good caramelization) and just reheat right before serving. Wonderful!

~~~

YUM!

'till we feast again!
xoabb

Tuesday, May 8, 2012

Shrimp & Bay Scallop...umm...Scampi?

Shrimp & Bay Scallop...umm...Scampi? by annbumbly
Shrimp & Bay Scallop....well....Scampi?
My entire grocery shopping list is totally and completely dependent on what is on sale (and, no, this doesn't seem to save me any money...dammit!). This week, much to my shock, jumbo shrimp were on sale for half their usual hefty price. So into the cart 2 lbs. went! Must say, I've never been very good with shrimp as we didn't have it a lot growing up as dad was allergic to it, and most of my basic cooking I learned from the years I lived at home. 
The only way I ever remembered having shrimp for dinner was boiled with seasonings, then thrown in the middle of the table (on a cookie sheet of course) and peeled by those of us who were enjoying the meal (only served when daddy was out of town). There probably was dipping sauce...but I really don't remember. DO remember what a wonderful meal it always was! 
At work today, I found Emeril's shrimp scampi recipe on foodnetwork.com so thought I'd try it. Got home, started making the recipe (no, I generally don't read through a recipe and pre-measure/prep everything, nor do I Clean-As-I-Go, much to my daughters' irritation) and realized it didn't really fit.  (Who the hell has the time to make ~shrimp stock~, whatever that is, an hour before dinner???) Here's what happened:

The T'nG:

butter, or, if you want to be healthy, olive oil
1 1/2 lbs. jumbo shrimp
1 lb. bay scallops
4 or 5 finely chopped garlic cloves
1 - 2 lemons, juiced 
at least 3/4 cup white wine (I used Sauvignon Blanc)
(a bit of sugar if mix is too sour - optional)
about a 1/2 cup half & half cream
2 Tablespoons chopped fresh parsley plus more for garnish
2 Tablespoons cold butter
Basmati rice, cooked to package directions
Steamed broccoli (what was our side dish)

Clean, devein and season shrimp well with salt and pepper. Heat a large sauté skillet over medium high heat. When pan is hot, add enough butter/oil to lightly coat pan. Add the shrimp in one layer and sauté until just turning pink, turn over and sauté a bit longer, till pink but not cooked through. Turn down the heat and add a bit more oil/butter and gently sauté the garlic for about a minute. Add the wine and lemon juice and set aside. In another skillet, heat it over medium high heat and warm up a bit more canola oil. Throw the scallops in the pan and cook until they begin to release their juices. When they've done that, drain them in a colander over the skillet with the garlic and wine so their juices all combine. Set the scallops aside. Bring the garlic/wine/lemon pan back to the heat, bring to a gentle simmer and reduce to at least half. After the alcohol has evaporated off, taste and if it's too tart, add a sprinkling of sugar. Add the cream and when that's warm, throw in the shrimp, scallops, parsley and 2 tablespoons butter. Heat through. Throw on more parsley for garnish and serve.
We served it over the rice with broccoli on the side. 


~~~

YUM!

'till we feast again!
xoabb

Sunday, May 6, 2012

I'll have the Spatchcock Chicken, please

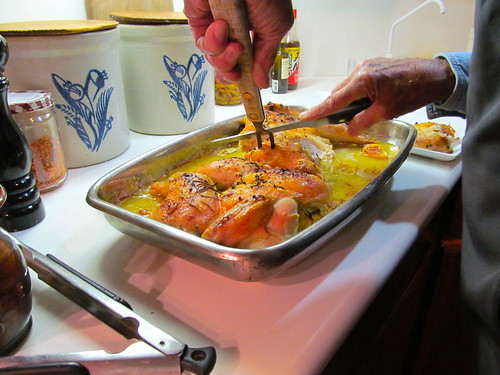
Carving the Spatchcock Chicken by annbumbly
My dad carving our spatchcock chicken - he's one mean bird carver!
My mom, a really really good cook/kitchen general/chef, started roasting spatchcocked chickens about a year ago and now won't do roasted chickens any other way! I wholeheartedly agree! They are beyond perfection!
Spatchcock means you cut out the backbone of the bird and break the beast bone so the chicken (or turkey/quail/squab) lies flat. This allows all the skin to uniformly brown and both the breasts and thighs be done at the same time. Results? Delicious! 
When she first started roasting chickens this way, she'd first put 1/4" slices of onions in the pan with slices of lemons on top for the chicken's "trivet". Now she uses a mandolin to very very thinly slice the onions then the lemons for the trivet. What a difference! These onion & lemon slices cook to the point that they are falling apart and are just delicious as a side to serve over the top of the chicken. I'm tellin' ya, once you spatchcock, you won't go back! 
Mom also made a big mess of greens and beans to serve with our spatchcock chicken (recipe follows). That particular night we had a mix of mustard greens, kale and collard. Really doesn't matter what greens you use, or what combination, it's all so very good! In the past I've always used just escarole because it's the one green that didn't scare me, but now the sky's the limit! I'm willing to try any combination of those gorgeous greens! (See below greens recipe for more photos.)

The Spatchcock Chicken T'nG (in mom's words):

Preheat oven to 425º.

1 chicken 2 1/2 lbs. to no more than 3 1/2 lbs. (get to know your butcher - most chickens in the case are much larger than this. If you ask your butcher for one of their uncooked rotisserie chickens, you'll get a good one!)

Remove any excess fat and skin. With poultry shears or Joyce Chen clippers, cut along both sides of the backbone, removing it. I find it easier to cut through the bones if you first cut through the skin along each side of the spine. Save the backbone to make chicken stock. (Start a bag and store it in the freezer till you have enough to make stock.) Place the bird, breast side up, on a flat surface and push down on the breast bone to break it and flatten (spatchcock) it.  

Lightly coat a shallow baking dish with olive oil. To that add: 

1 large onion sliced very thinly - use a mandolin
1 lemon, sliced very thinly

Mix the lemon with the onion and spread in the baking dish(1). Add to that fresh thyme sprigs, fresh rosemary, fresh sage leaves; any herbs you like or have on hand - be sure to evenly scatter over your onion and lemon slices(1). Set the bird on top and bring the legs around so they fit flat and just under the breast (see above, or click on above photo to see more pics of the process), and also below pics  2&3). Lightly coat the chicken with olive oil and then season with more herbs, red pepper flakes/cayenne, salt, black pepper, and any other seasoning of your choice(4). Squeeze juice of a lemon over the bird. 

Bake for about an hour or until thermometer reads 165º (chicken will keep "cooking" after you take it out of the oven for some minutes). If it's browning too quickly, reduce the oven temp to 375º. Let chicken rest for 5 - 10 minutes before carving(5).

Serve pan juices with all the onion and lemon bits with the chicken. Encourage folks to put this strange looking stuff on their chicken serving. And be sure to save any left over pan juices after dinner to freeze for future sauces, gravies or soups. 


~~

Beans & Greens
(last photo, below)

The B&G T'nG (in mom's words):

2 tablespoons olive oil
2 cloves garlic, smashed and roughly chopped
1/4 teaspoon crushed red pepper
1 medium onion, chopped
1 1/2 lb. kale, rinsed and cut into 1" sliced, crosswise
1 lemon, juiced
salt & pepper to taste
2 15 oz. cans cannellini/white beans, rinsed well
EVOO for drizzling - optional

Heat oil in a large sauté pan and, when hot, add the onion, garlic and crushed red pepper. Sauté until the garlic is fragrant; about 30 seconds. Add the kale and season with salt and pepper. Squeeze the lemon over the kale and stir. Fold in the beans, cover and simmer until the kale is wilted and cooked through, about 20 minutes. To serve, transfer to a serving dish and drizzle with EVOO.

Mom writes: "This can be altered to serve 2 people, and remember both of these recipes are just a starting point! Different greens, other beans or whatever. Herbs are up to you as well."

~~
 1

2

3

4

4

5

Beans & Greens

~~~


YUM!

'till we feast again!
xoabb

Tuesday, March 27, 2012

Chicken in the Oven (3 Ways!)

Crispy Oven-Fried Chicken by annbumbly
Crispy Oven-Fried Chicken w/a Twist
Over the last week or so, we've had three chicken dishes for dinner that we all loved and will repeat again and again. The first one, pictured above, Remy made and I took the loverly photo. For the other two, I found their delicious-looking photos on pinterest.com and, after much clicking, was finally able to track down both recipes! Remy's recipe is only six ingredients, and the next two are only four ingredients!

Here's a tip I've found to be extremely wonderful: Toward the end of cooking any chicken in the oven (or anywhere else), start checking to see if it's done by using a meat thermometer. Before I started using one (a digital thermometer), I almost always overcooked chicken because I was scared of not getting it cooked thoroughly.

~~~

Crispy Oven-Fried Chicken w/a Twist

2 - 2 1/2 lbs. chicken pieces - Remy used skin-on chicken legs. (Use your favorite pieces.)
flour for dredging
1/2 - 1 cup milk
1 egg
1 box Kraft brand Oven Fry for Extra Crispy Chicken
1 package Lipton Recipe Secrets Onion Soup & Dip Mix
2 tablespoons canola oil

Preheat oven to 400º. Put oil on a cookie sheet and be sure all the sheet is covered in oil. Put flour in a bowl or bag. Mix together milk and the egg in another bowl. In your third bowl, mix together the box of Oven Fry and Lipton package. Dredge chicken pieces in the flour and shake off excess. Dip pieces in the milk/egg mixture, letting excess drip off. Roll pieces in the Oven Fry/Lipton mixture, pressing mixture into the chicken. Place on the cookie sheet. When all are coated, put pan in the oven and bake, if bone-in 20 minutes per side or until chicken registers 165º internally, if boneless, bake about 20 - 30 minutes in total, or until chicken registers 165º at the center of its thickest part.
Delicious! The onion packet gives it such a good flavor!


~~~

Please click on either of the above links to see a photo of this incredible chicken dish.

1 1/2 lbs. chicken thighs, bone-in and with skin (or use whatever pieces you want)
1/2 cup dijon mustard
1/4 cup real maple syrup
2 tablespoons rice wine vinegar
salt and pepper to taste
1 tablespoon cornstarch
fresh chopped rosemary

Preheat oven to 450º. Mix together the mustard, maple syrup and rice wine vinegar. Put your chicken in an oven-proof baking dish; don't worry about crowding. Salt and pepper the chicken and then pour your maple-mustard mixture over them, turning to coat the pieces on all sides.  Put your dish in the oven and bake for about 40 minutes, or until they are 165º at their thickest part. Let chicken rest, lightly tented, for 5 minutes before serving. Immediately after plating chicken, whisk in the 1 tbsp. of cornstarch into the liquid in the pan. You'll create a nice, thick sauce to drizzle over your chicken. You need to do cornstarch mixing immediately because the liquid needs to be hot in order for it to thicken properly. If it's still not thickening after 1 tbsp., you can add a little more. Be sure to spoon sauce over each serving, and add the rosemary.

*Witty in the City also sprinkled some fresh chopped rosemary over her chicken just before serving it. I didn't as I totally forgot to do this step - and I have a beautiful rosemary plant right in my kitchen! I'm sure it would have been delicious. 3/4/13 - this time I remembered to sprinkle the chicken with the rosemary - what a great additional taste! LOVE this dish!
I made a double batch of this for our Sunday Family Dinner, plus a double batch of the following recipe, thinking I'd have chicken to take to word all week. It's only Tuesday and every single morsel of both of them is history. Yup, they were that good!

~~~

Please click on either of the above links to see a photo of this incredible chicken dish.

4 boneless skinless chicken breasts (or whatever chicken pieces you enjoy)
4 garlic cloves, minced
4 tablespoons brown sugar
3 teaspoons olive oil
salt & pepper to taste

(This dish makes for a very sticky pan. Do yourself a favor and line you pan with foil for easy clean-up.)
Preheat oven to 500º. Lightly grease a casserole/baking dish. In a small skillet, over low-medium low heat, sauté garlic until tender - do not brown. Remove from heat and stir in brown sugar. Place chicken breasts in the baking dish and cover each with the garlic and brown sugar mixture. Salt and pepper to taste. Bake, uncovered for 15 - 30 minutes; until the chicken is 165º at its thickest part. Just delicious!


~~~


YUM!

'till we feast again!
xoabb

Monday, March 12, 2012

Chicken Curry with all the Fixin's.


Chicken Curry w/all the fixin's. by annbumbly
Chicken Curry 
(that's a dollop each of apricot jam and chutney on top!)
(Click on the photo for two more pictures of the other stages of this recipe.)

When I was growing up in Missouri, my parents were part of a group of 12 bridge players that met once a month pretty much year round. One of the night's duties for whomever was hosting was feeding all those folks dinner. I remember this chicken curry dish well from those nights! First time I ate it, I fell in love! The flavors are just wonderful and it's such a pretty dinner to serve what with all the little bowls of the different flavors you put on top of the rice and chicken. Try it, and I guarantee everyone will be ohhing and ahhing! (This looks long and complicated. It's not. The entire thing takes maybe an hour - think shortcuts! And if you're having a dinner party, almost the entire dish can be made ahead of time.)


The main ingredients part:
5 cups chicken meat - I tend to lean toward all white meat, but you can certainly use dark as well
2 cans coconut milk (be sure it's UNsweetened and look for it in the Asian foods section) OR equivalent homemade coconut milk from a fresh coconut (directions below)
1-2 large cans chicken stock, or equivalent homemade, boiled down to 3 - 4 cups
1 cup chopped onion (or buy a container of already chopped)
1 cup chopped celery (see above)
1/4 cup++ unsalted butter
4 tablespoons or so flour
3 tablespoons+++ Madras brand curry - Penzey's has some great ones as well (hot curry if you prefer, I personally like the mild one and add cayenne)
2-3 tablespoons tomato paste
cayenne pepper to taste
salt & fresh ground black pepper to taste 
2 cups basmati or jasmine rice, cooked according to pkg. directions so it's done just before you serve

The chicken part:
Simmer chicken in the canned chicken broth, or make your own broth - whichever is used, I always add 3 or 4 whole allspice and the juice from a fresh-squeezed lemon to enhance the broth's flavor. When the chicken is barely done (it will cook more toward the end), remove from broth and cool. When cool, shred/tear (no knives allowed!) it into bite-size pieces. (Tap on photo above to see an example of size.) Boil broth down till you have 3 - 4 cups. Skim off fat if there is any. 

The coconut part:
(Canned coconut milk is so much easier and NO one will know the difference!)
However, if you're feeling particularly ambitious: Poke open the holes in the end of 1 or 2 fresh coconuts, drain the juices from inside and discard (unless you want to drink it.) Break into manageable pieces (A hammer and a concrete cracking place works well.) Microwave pieces on high for 1 - 2 minutes. You can then carefully insert a knife between the shell and coconut meat and easily wiggle them apart. Put 2 - 3 cups HOT water in a blender, and while running on a slow speed, add the coconut meat pieces bit by bit. When all is added, blend on high until meat is very finely chopped. Let set until ready to use, then strain through cheese cloth. (This was written long before food processors - I'd think that would be a more efficient way to make this.)

In 2 tablespoons butter, saute the onion and celery. When becoming translucent, push aside to make a ring. Melt 3 more tablespoons butter in the center, and when melted, add the flour and the curry. Stir, cooking for 3 - 5 minutes, then stir the entire skillet together. Transfer this mixture to the pot you boiled your chicken in and add 2 cups chicken broth and one can coconut milk. Simmer this mixture for about 30 - 40 minutes. (You can cool and refrigerate at this point.) Just before serving, heat and taste your curry mixture to be sure the seasonings are correct,(I always end up adding more curry and cayenne), then add chicken and mix thoroughly. Add at least 1/2 more can of coconut milk and more chicken broth if still too thick (again, click through on above photo to see an example).

The most important part: 
(What goes on top of your chicken curry (and what makes it such a perfect party entree).)
Putting each in their own pretty bowl with a spoon, you must include the following: 

3 hard boiled eggs, very finely chopped
1 cup +/- unsalted peanuts, toasted and roughly chopped
1 cup +/- curly parsley, chopped
1 lb. bacon, fried very crisp, drained and finely broken up (I've been known to use bacon bits from Costco.)
1 cup +/- Major Grey's Mango Chutney (usually in the jelly/jam aisle)
1 cup +/- sweetened coconut, toasted
1 cup +/- fresh bananas, roughly chopped; squeeze a little lemon juice on to keep from discoloring
1 cup +/- apricot preserves
1 cup +/- scallions/green onions, tops included, roughly chopped
1 cup +/- golden raisins or currants
(If you think of anything else to add to this list, do let me know!)

To serve:
Put the chicken curry in one lovely serving dish, preferably with a lid. Place the rice in another bowl, preferably lidded, and place both on the buffet - this works much better if it's not on the table you're eating at. Place all the condiments by them. Let everyone serve themselves: rice first, curry mix over the rice, then the condiments in whatever combination each person wants. 
A green salad completes the meal. 

 The zing of all those flavors in your mouth is incredible!

This is so so good, everyone will love it, it's so impressive to serve, such fun for everyone to put together their own flavors, so cheap - just perfect!


~~~

YUM! 

'till we feast again!
xoabb

Thursday, March 8, 2012

Pork Chops w/Pineapple Fried Rice

The pork chops w/the onions by annbumbly
The Pork Chops w/the Sauce & Onions Part
(click on the above photo to see 3 more)
(or just go to P-Dub's to see really good photos)

Smart girl that I am, when I see a particulary appealing recipe, I want to EAT it! And pretty much immediately. Ree Drummond (aka The Pioneer Woman/P-Dub for the 3 folks in the USofA that don't know who she is) posted a recipe for pork chops with grilled pineapple fried rice the other day that looked so darn good, I couldn't wait to try it. It didn't disappoint. Not in the least! Now don't go and compare my camera work to Ms. Drummond - there is absolutely no contest as to who is the better photographer - just do yourself a favor and visit the recipe link above or here to see her step-by-step pictures.
I followed all of P-Dub's recipe except the veggies in the fried rice (yup, that's the T'nG). I couldn't find the jarred pimentos (was at Whole Foods and they don't carry any), so for color, I added corn and 3 carrots. Delicious!

The T'nG:

1/2 whole pineapple, cut into spears
2 cups white (or brown) basmati rice
3 carrots, quartered length-wise and then cut so size is same as peas and corn
4 - 6 boneless pork chops
1 tablespoon butter
1 tablespoon peanut or canola oil
1 whole large sweet onion sliced, quarter slices (or slice from top to bottom - I like that better)
6 tablespoons reduced salt soy sauce (more to taste, or if more liquid is needed)
1 tablespoon rice wine vinegar
2 tablespoons honey
1 tablespoon Sriracha sauce
3 cloves garlic, minced
2 whole eggs
1 cup frozen peas
1 cup frozen corn
2 tablespoons soy sauce (additional)

Throw carrots in with the rice and then cook the rice according to package directions. (The brand of basmati I use calls for cooking 2 cups rice in 8 cups water and then drain when done.)
Grill  pineapple spears until they have good grill marks on all sides. When cool enough to handle, cut spears into bite-size chunks and set aside. Heat butter and oil over medium high heat, then add the pork chops to the pan. Saute on both sides until they have nice color. Throw in the sliced onions and work them into the crevices between the chops. Shake the pan and move the onions around and let them cook for a good couple of minutes.
When the onions are beginning to soften, add the soy sauce, rice wine vinegar, honey and sriracha. Shake the pan, stir it around, and let it cook and bubble up for a good couple of minutes until the chops and onions look like the above photo and to chops are done. Remove chops to a bowl, the let the cause cook another minute or two. Taste and correct seasoning of sauce. When satisfied, pour sauce over the chops and set all aside.
Add a small amount of oil to the same pan (without cleaning it) and return it to the stove top over medium-high heat. Add the garlic and stir it around, then crack in the eggs and immediately stir them to scramble them a bit. Add the peas and corn and a couple additional tablespoons soy sauce. Add the cooked and drained rice and carrots and stir all until well blended and veggies are cooked through. Add the pineapple bites and gently give the fried rice a final stir.
To serve, pile rice on the plate, top with a pork chop and onions and drizzle some of the sauce over all.

YUM!
~~~
'till we feast again!
xoabb

Wednesday, February 29, 2012

Shaping the Trout Cakes

Shaping Trout Cakes by annbumbly
Remy shaping the trout cakes into patties


When we went home to Columbia, MO last summer, I found that my mom and daughter had discovered a new cookbook, Cooking Wild in Missouri, that is printed by the Missouri Department of Conservation. Rem took one look at it (it's beautifully photographed) and declared she was going to "cook the book". A worthy endeavor! The recipes are spot-on, and the ingredients Missourahhh wonderful! The first recipe she made was the following trout cakes. 
Columbia happens to have an over-the-top-wonderful farmer's market and there's a gal that comes up from the Ozarks each week who sells fresh farmed trout. The day we were there, we bought two extra trout knowing we wanted to try this trout cake recipe the next evening. We were not disappointed. Oh no, not in the least were we disappointed! 

Missouri ~Crab~ Cakes

Actually these are Missourahhh trout cakes made New England crab cake style. What could be better than that? (As I said, this recipe is from the cookbook written by Bernadette Dryden and titled "Cooking Wild in Missouri". It's only $15.00. Do yourself a favor and buy it! Now!) Ms. Dryden serves this over a salad with a citrus vinaigrette (recipe follows) - and so did Remy. Delicious!

The T'nG:

1 cup picked over trout (no bones allowed) (left over from previous grilled meal)
1 cup breadcrumbs (homemade preferred)
4 tablespoons fresh grated Parmesan or Romano cheese
2 scallions, finely chopped
1/2 red pepper, finely chopped
1 gargantuan tablespoon finely chopped parsley
1 heaping teaspoon of fresh Bum hot or other hot red pepper
juice of one fresh lemon
salt and fresh ground pepper to taste
2 tablespoons unsalted butter
Mix trout well with 1/4 cup of the breadcrumbs and the next 7 ingredients, through the salt and pepper. Your mixture will be moist. Form into 2 inch wide patties. Dip patties in the remaining bread crumbs and pat all over. Fry in the butter over medium heat, cooking until the bottom side is golden brown. Carefully turn over and brown the other side.  Toss your salad greens with the citrus vinaigrette dressing. Serve 1 - 2 trout cakes on top of the salad. 

~

Citrus Vinaigrette Salad

fresh mixed salad greens
extra virgin olive oil
fresh lemon juice
fresh garlic, finely chopped
salt and fresh ground pepper
Wash salad greens, dry and put in salad bowl. Mix approximately 3 parts oil to 1 part lemon juice. Add a touch of garlic and whisk vigorously. Season to taste with the salt and pepper and whisk again. To test, dip a piece of lettuce in the dressing. Correct seasonings. 

Put salad on a plates and the add two trout cakes per plate. 

Monday, February 27, 2012

Shepherd's Pie & Mary Poppins - Yes, They Go Together!

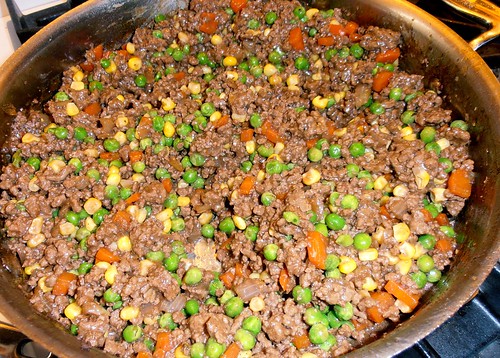
The Beginnings of Shepherd's Pie by annbumbly
Well, at least the beginnings of Shepherd's Pie
When our children were growing up, our lovely Sheila lived with us and was their ~Mary Poppins~. In the years since, tho no longer living with us, she has most definitely become family. She brought many wonderful things to our family, and one of the very best was her English cooking. No groans allowed, as we all quickly figured out that most English cooking, aside from waaaay over-cooked veggies, is really really delicious! Miss She introduced us to Scotch eggs, rice pudding, corned beef hash (whoa thunk that would be delicious!?!) and, drum roll please, Shepherd's Pie, to name a few. 
Much as I love it, I hadn't made Shepherd's Pie for years. Until recently. I had a taste for it about a month or two ago and decided it was time to recreate Sheila's masterpiece. It was wonderful and most amazingly, the hubs loved it too.  We've enjoyed it pretty regularly since then, to the point that when I made one for dinner for the Murray family who were returning from a ski trip, George (the hubs) said I couldn't take them one unless there was one for us as well. Happy to oblige!

Amounts to your preference:

1 1/2 or so lbs. ground beef
3 - 5 carrots, quartered length-wise then sliced 1/4" thick
1 medium onion chopped to size of the carrots
1 - 2 Tablespoons butter 
1 - 2 cups water
frozen corn, amount to your taste
frozen peas, amount to your taste
1 1/2 C. gravy (homemade or if you don't have that, a Better 'n Gravy or McCormick packet)
Worcestershire sauce to taste
salt and fresh ground pepper to taste
any other seasonings you might like

mashed potatoes
shredded cheddar cheese
paprika

Preheat oven to 350º. 
In an iron (preferably) skillet, brown the ground beef and then drain into a bowl so you can separate fat from any liquids. Set aside. Melt butter in same skillet and sauté the carrots and onions over medium high heat for 5 or so minutes. Pour the water over the carrots and onions just to cover and boil off the water. This tenderizes the carrots. Add beef, and any liquid left from draining it, back to the skillet and mix all together. Pour on the gravy to moisten it all - but don't add too much as you don't want it soupy. Add Worcestershire sauce, salt and paper and any other herbs you might like. Stir together well and taste to be sure seasonings are to your liking. Just before topping with the mashed potatoes, pour in desired amounts of corn and peas. I generally add about a cup of each. 
If you're not using the skillet you've just made everything in, pour mixture into a casserole dish. Top with mashed potatoes (recipe below), then sprinkle with the cheddar cheese and lightly with paprika. Bake until bubbly and hot through and through, about 30 - 45 minutes. This can be made ahead. Just be sure to bring it to room temp. before baking. 

Mashed Potatoes

Alrighty then...a bit of honesty is required here. Because of good advice I've gotten from cousin Julie, the last two times I've made Shepherd's Pie, I've cheated and bought already made mashed potatoes. Simply Potatoes and Country Crock are two brands. I heat them in the microwave according to package directions, then whip them with a little extra melted butter, salt and pepper and freshly grated nutmeg. Heck of a lot easier than making from scratch, and in this instance, no one can tell the difference! However, for those of you (hello Mom!) who are pure of heart, here's the from scratch way: 

3 - 5 lbs. russet potatoes, peeled, halved and cut in thirds
1 C. or so hot milk
1 stick butter, melted in milk
salt, fresh ground pepper and nutmeg to taste

Put potatoes in a pot with water just to cover. Boil until potatoes are done. Drain potatoes and put through a ricer (my preferred way). Mix in milk, butter and seasonings to taste. 

~~~

YUM!

'till we feast again! 
xoT'nGG