Showing posts with label dessert. Show all posts

Tuesday, February 5, 2019

Peanut Butter Pie - No Oven Required!

drizzled with chocolate syrup certainly puts this pie slice over-the-top!

I served this pie to my hubs, GB, last night. His comment? "Damn, Ann, why did it take 41 years for you to figure out how to make a dessert during the weekdays? This is fantastic! It would have been even more fantastic if you'd started giving it to me 41 years ago! You have a LOT of desserts to make up for!" Hmph!

Earlier this week, I saw a recipe for peanut butter pie (which I'd never heard of before, let alone tried) on that wonderful website, Skinny Taste. I can certainly understand how savory foods can be made less caloric and better for you, but sweets? Really? How can you possibly skimp on fats and sugar and have anything that's edible? Not a believer here! So! I decided to make the ST peanut butter pie (2nd recipe)  and a second pie (1st recipe) that was the full fat/sugar version. Went off to find a recipe for that full fat/sugar recipe online and there were hundreds of them! Wow! It looks like peanut butter pies are wildly popular! Whoda thunk?? 
While I followed the ST recipe as closely as I could (used Jiff peanut butter and fat-free Cool Whip instead of the recommended Better n' Peanut Butter and Truwhip because I couldn't find either of those products (links to both below recipes), I sort of did my own thing with the second pie, using the same basic ingredients, but not exactly the same amounts as in the recipes I'd found.
Amazingly, Ms. Homolka's ST recipe was delicious. It didn't have the volume the full fat/sugar version had, but it had just as much flavor. The full fat version was much prettier, and also felt a lot heavier in the belly once consumed. (Know this is truth, having had a piece of each, one day apart.)

So the question of the hour is: Which would I make again? Either! They're both so good! Each have their advantages - tho ST even more so if you're using the WW points system. If you love peanut butter, this is the dessert for you, no matter which recipe you use! The first recipe is what I threw together, the second is by Ms. Homolka of Skinny Taste.


1st recipe - the full fat/sugar version - delicious!


The throw together:

1 C. Jiff peanut butter
6 oz. cream cheese, room temp.
1/2 C. powdered sugar
1 t. vanilla extract
1 container Cool Whip, thawed
1 chocolate graham cracker crust (bought)
Hershey's chocolate syrup for drizzling (optional)

Mix together peanut butter, cream cheese, powdered sugar and vanilla extract with an electric mixer until smooth. Fold in Cool Whip and vanilla and the finish smoothing all out with the electric mixer. Scrape into the pie shell, cover and refrigerate for at least 2 - 3 hours. When serving, drizzle chocolate sauce across the pie or across each serving piece.

~~~

2nd recipe - the Skinny Taste version - not as fluffy, but still delicious!


5 oz. 1/3 fat cream cheese, softened
1/3 C. powdered sugar
1/3 C. Jiff peanut butter (Better 'n Peanut Butter* substitution)
1 container fat-free Cool Whip (Truwhip** substitution)
1 graham cracker pie crust
2 T. Hershey's chocolate syrup (optional)

Beat cream cheese and confectioners' sugar together in a medium bowl.
Mix in peanut butter and beat until smooth. Fold in Cool Whip.
Spoon into graham cracker pie shell; cover and refrigerate unti firm, at least 2 - 3 hours.
Drizzle with chocolate syrup before serving.

*Better 'n Peanut Butter
**Truwhip Skinny Topping

(I used fat-free Cool Whip instead of light Cool Whip to make up for the fact I used peanut butter instead of Better 'n Peanut Butter.)


~~~

Yum!

'till we feast again!
xoabb

Saturday, November 24, 2018

Summertime Peach & Basil Shortcake


Sweet Missourahhh peaches - they were incredibly good last summer, unlike our CT peaches that had no flavor. At all.
Tossed with fresh basil ribbons. 
I spend a good portion of every summer in COMO, now with my dad, and before she died, with both my parents. I'm lucky enough to work in a school system, so have regular vacations all year long, with the summers completely off. My sibs, Carrie and Bill, are able to do the same and often our visits overlap. Nice! This summer, my sis and I visited at the same time, and one of our cooking challenges, now that mom is gone - and our father's sweet tooth hasn't abated one bit - is coming up with new desserts for him. Mom was one of the best amateur chefs that has ever cooked, so it's hard to top what she could do - with one hand tied behind her back! Well, with this recipe, we certainly succeeded! The key to this is to have super sweet local peaches. And this year, in MO, they delivered! They were the very best flavorful peaches we've had in years! When I came back to CT, I immediately went to the farmer's market and bought peaches. Several times. And at several different farmer's markets. Absolutely. No. Flavor. In any of them. Amazing it was such a good peach year in MO and a hideous one in CT. While you can make this any time of year, summertime peach season is the ideal time! Sis Care & I made this for dad in August 2018. Truly the best shortcake I've ever had - the first I've actually liked. And, basil combined with peaches is just an incredible flavor combination!

Our shortcake. This recipe makes one of the only shortcakes I actually like.
Not a big fan usually.


Topping:

4 C. peeled, sliced peaches, about 3 lbs. (local if at all possible, southern only if not)
1/4 C. sugar
1/3 C. or so small fresh basil leaves cut into ribbons
1 1/2 T. fresh lemon juice

Shortcake:

2 1/4 C. flour
1/3 C. sugar, divided
1 T. baking powder
1/2 t. baking soda
1/4 t. salt
a grating of nutmeg
6 T. chilled butter, cut into pieces
1 C. buttermilk (or 1 C. (not skim) milk w/1 t. cider vinegar - let stand for 15 minutes)
cooking spray
1 1/2 t. 1/2 & 1/2 
1/4 cup sliced or slivered almonds


To prepare the topping, combine peaches, sugar, basil and lemon juice in a bowl; let stand 1 hour. 

Preheat oven to 400º. 

To prepare the shortcake, lightly spoon flour into dry measuring cups and level with a flat knife edge. Combine flour, 7 T. of the sugar, baking powder and soda and salt in a bowl; stir with a whisk. Cut in butter with a pastry blender or two dinner knives until the mixture resembles a coarse meal. Stir in buttermilk with a dinner fork just until combined (do not over-mix). Spoon the dough into a 9" round metal baking pan coated with cooking spray. Gently brush the dough with milk. Evenly sprinkle with the remaining sugar and almonds.

Bake at 400º for 23 minutes or until a toothpick inserted in the center comes out clean. Cool for 5 minutes in the pan on a wire rack. Remove shortcake from the pan and cool completely on the wire rack. 

Cut shortcake into 12 wedges and then cut each wedge in half horizontally. Top each bottom with 1/3 C. peach mixture and, if desired, a scoop of vanilla frozen yogurt or a spoonful of whipped cream. Artfully lay top half of the wedge on top, Enjoy!

This recipe was in the June 2012 Cooking Light magazine and is by Ruth Cousineau. 


~~~

'till we feast again!
xoabb

Friday, November 23, 2018

Donut Holes - One of my Very Favorite Things!!

Donut Holes!!!
YUM!!!

When I was growing up, we used to go to Staunton, IL to visit our mom and dad's best friends, Cathy and Jim Hawkins and their four kids, Susan, Sally, Jim and Teresa. We always had a whale of a time, playing together and playing jokes on each other, (Carrie, remember the time when Jim said his farts could be lit on fire, threw his legs over his head and Susan lit a lighter as he let out a TREMENDOUS fart - that actually blazed four feet from his butt?? Pretty special that!) and causing general mayhem. The other thing I remember from that time is visiting the Ubans. They were also good friends of our parents and the Hawkins. Peggy Uban's specialty was glazed donuts. Beautiful wonderful glazed donuts. While I don't have her recipe, daughter Brynnly came up with a fairly close recipe that brought me back to one of our childhood delights.


For the donut holes:

oil for frying in a Fry Daddy (or equivalent pot)

1 C. milk
1 large egg
2 C. flour
2 T. sugar
4 1/2 t. baking powder
1/2 t. salt
1/4 C. butter, melted

For the glaze:

1 1/2 C. powdered sigar
3 1/2 T. whole milk/cream
2 t. vanilla extract

Mix all together

For the sugar-cinnamon mix:

sugar to taste
cinnamon to taste

Mix all together


Add the oil to your Fry Daddy or equivalent pot. Put a grate on a baking/cookie sheet.
In a bowl, whisk together the milk and egg. In a separate bowl, whisk together the flour, sugar, baking powder and salt. Stir in the egg/milk mixture. Now stir in the melted butter, and mix until a soft dough forms. Once the oil reaches 350º, use a small scoop or your fingers to drop about 1 T. of dough into the oil, being sure not to over-crowd the pan. Fry the donut holes, flipping them over in the oil, for about 2 minutes or until they're golden brown, Using a slotted spoon, transfer the donut holes to the grated baking sheets. Allow the donut holes to cool slightly. Then, either roll in the glaze or in the sugar mixture. Place back on the grates. After a minute, serve...and go to heaven!!!


~~~

YUM!

'till we feast again! 
xoabb

Monday, July 9, 2012

Any Fruit Crisp - Mum Bum YUM

Fruit Crisp by annbumbly
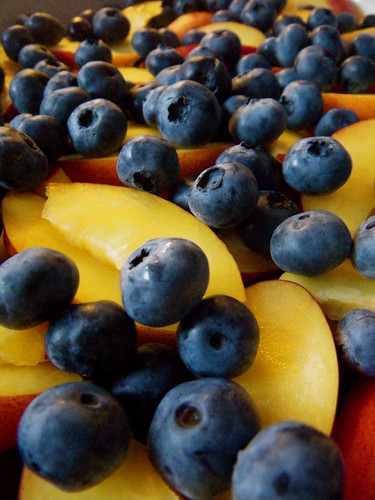
Beginnings of a  blueberry-nectarine crisp
What a treat!

My mom is the quintessential fruit crisp and pie maker, bar none. Give her some fruit and quick as can be, we'll be treated to a delicious dessert! I asked her to please write down how she makes her crisps and pies because, of course, she'd never done that (true T'nGG). Instead, she dictated directions to me which I wrote down for our family. (Family recipes are most important. Remember that!) Follow her directions and you will have created one of the most delicious and memorable desserts you've ever bitten into. YUM! (Pie fixin's to come.)

The T'nG (in mom's words):

Heat oven to 400º.

The Filling: Put your fruit of choice in an au gratin dish. Fill until about 1/2" from the top. (This could be unpeeled fresh peaches, nectarines, Italian prune plumbs or other plums. Or apples, fresh blackberries, blueberries, hulled bing cherries, tart cherries (adjust sugar amount accordingly for tartness), a mixture of berries and slices (see above), or rhubarb, rhubarb with strawberries; whatever you like. You can also use frozen fruit. (Citrus isn't appropriate for this.)

The Topping: A rounded 2/3 C. flour, 2/3 C. sugar, 1/2 C. regular oatmeal (not steel-cut). If an apple crisp - add cinnamon; peach or nectarine - add nutmeg; cherry - add almond extract. Put all in a food processor and pulse enough to mix. Add 1/2 - 1 stick cold butter that's been cut into chunks and added a chunk at a time. Pulse until you have a coarse meal. (You can also do this with two forks or a pastry cutter if no food processor is available.) Spread that over the top of the fruit so all is covered. Bake at 400º for about 45 minutes. It's done when the crust on top is getting golden brown and the fruit juices are bubbling up from below. 

You can use any size oven-proof dish, just add amount of fruit and topping accordingly. The larger the dish, the longer it will take to bake. Delicious!

This is the very best baked an hour or two before you want to serve it, so it hot! It's excellent with a dollop of creme fraiche or excellent vanilla ice cream on it. 

P.S. - It's really true - you don't ever need to bother to peel the fruit. Absolutely not necessary - you'll never know the peel is there as it just melts away during baking. Plus, think of the fiber....well, maybe don't think of that....


Just out-of-the-oven peach (no blueberries this time) crisp

~~~

YUM!

till we feast again!
xoabb

Friday, June 22, 2012

Annnnd We Have...Another Cake from the Non-Baker!

IMG_0001 by annbumbly
Sawdust Cake
Photo taken w/cake resting on the grass just before said cake and I got into the car to go to bridge night.
It's all Lauren's fault. Totally and completely. She knows I don't bake, but based on the fact I made that other cake that turned out to be a yummy success, she sent me the following email: "Hey Baker Lady. Bake this!" Never one to shy away from a challenge, and knowing bridge night was next evening and I'd have a captive audience of ladies that love their sweets, I told Miss LaLa her cake was forthcoming! Though I call this ~Sawdust Cake~, it's actually called Cornmeal Buttermilk Cake. Lauren found the recipe on the Tasty Kitchen website and the gal that posted it there got the recipe from Kelly's website. Whatever, it is one delicious cake!
Both the previous recipes called for it to be baked as a layer cake. Because I was taking it with me, I baked it in a 9 x 13 pan that had a handy dandy carrying cover (um...I also have no round cake pans). Don't think that made a bit of difference to the wonderful flavor! 
This is a very sturdy cake, quite different from the texture of most, but delicious none the less. Enjoy!

The Decidedly Not T'nG: (oh dear, this decidedly not T'nG cannot become a habit!!):

For the cake: 
1 3/4 cup all-purpose flour
1/3 cup yellow cornmeal
1 teaspoon baking powder
1/2 teaspoon baking soda
1/2 teaspoon salt
1 cup sugar
1/2 cup packed brown sugar
8 tablespoons unsalted butter, melted
1 cup buttermilk
1 teaspoon vanilla
4 eggs at room temp.

Heat oven to 350º and spray a 9 x 13 pan with non-stick cooking spray. In a large bowl sift together the flour, cornmeal, baking powder and soda, salt, sugar and brown sugar. In a medium bowl whisk together the butter, buttermilk, vanilla and eggs until well combined. 
Pour the wet ingredients into the dry and mix until there are no large lumps of flour remaining. A few small lumps are fine. Pour the batter into the pan and bake for 25 - 30 minutes, or until the cake pulls away from the side of the pan and a stuck-in toothpick come out clean. Cool in the pan on a rack. (I waited till it was cool, covered it and refrigerated it overnight. It was iced the next afternoon.)

For the Frosting:
4 oz. semi-sweet chocolate, melted (follow box directions)
2 sticks butter at room temperature
1 teaspoon vanilla
1/4 cup cocoa powder
4 1/2 - 5 cups powdered sugar
1/3+ buttermilk

In a large bowl, cream together the melted chocolate and butter until smooth and creamy. Add in the vanilla, cocoa powder and powdered sugar (powdered sugar a bit at a time) and begin mixing. Slowly add in the buttermilk until the frosting reaches your desired spreading consistency. If the frosting is stiff (mine was), add a but more buttermilk until the right consistency is reached. Frost the cake. 
(Note: I knew this was going to be too much frosting for a sheet cake, but there really is no way to halve this recipe. So...I made the whole amount and told my hubs there were left-over and to enjoy. Let's just say, he took me at my word, (though I did throw some away. Not much, but some.)
A slice after the icing had melted in our 98º day, but you can see the denseness!

~~~

YUM!

'till we feast again!
xoabb

Monday, June 4, 2012

Auntie M's Chocolate Picnic Cake (certainly NOT a T'nG)

Chocolate "Picnic" Cake by annbumbly
Aunt Madeline and Cousin Louise surely knew what they were doing!
A small note....though I'm not a measuring kind of gal, I know enough about cooking to understand that when you bake, it's all about the measuring. The recipes below are ALL about measuring and NOTHING about throwing and going. I don't do the measuring kind of cooking/baking often because I'm not very good at it, but it was my turn to do dessert, so I figured, what the heck, let's try this for the very first time! Guess what? The ~measured~ results were quite tasty! Enjoy!

The hubs and I have been part of a Gourmet Group/Club for the last 11+ years. We've had the best time, and have established long-term friendships with all in the group. All of us are good (being a relative term) cooks, and have improved on that status over the years because of our cooking endeavors for the group. Sometimes we take it easy, as we did tonight with our summer barbecue theme, and other times we choose a cookbook like ~The One & Only Palmilla~ by Charlie Trotter to really push our limits.  
Our theme for tonight's Gourmet Group gathering was Summer Barbecue, and I was the dessert person - something I really don't relish. At all.
So I volunteered to do something I've never ever done before in my life. I volunteered to make a chocolate cake. From scratch. I am not a baker, and certainly not a cake baker! But old dogs can learn new tricks....yes??? 
Jane, the gal I work with and who I share all my woes with, immediately took sympathy on me and said she would dig up some of her old fail-proof (key words there) family chocolate cake recipes for me to choose from. Oh my! I'm so glad she did! The cake recipe is from either her or her mom's Aunt Madeline and the icing recipe is from her or her mom's cousin Louise. Obviously there's been a whole lotta good cookin' going on in Jane's family! 

The T'nG Recipe:

Aunt Madeline's Picnic Chocolate Cake

4 squares baking (bitter) chocolate (bitter chocolate - I didn't realize what that was and had bought semi-sweet chocolate squares. After a check on google, I found that if you mix 3 tablespoons cocoa powder (I used Dutch cocoa powder) with 1 tablespoon canola oil, it's the same as 1 baking square, so I did that (x's 4), but still heated it over the hot water)
1/2 cup butter
2 cups sugar
2 eggs
2 2/3 cup sifted cake flour
2 teaspoons baking powder
1/2 teaspoons salt
2 cups buttermilk
2 teaspoons baking soda
1 teaspoon vanilla

Preheat oven to 350º. Grease and flour a 13 x 9 x 2 pan. Melt chocolate over hot but not boiling water in a double boiler or in a bowl set over a pot. Cream the butter and add sugar gradually; cream until light and fluffy. Add the eggs, one at a time, and beat well after each addition. Sift the cake flour, baking powder and salt together. Stir baking soda into the butter milk. Add cake flour mixture and buttermilk alternately to the creamed ingredients. Blend in the vanilla and melted chocolate and mix thoroughly. Pour into your prepared pan. Bake about 45 minutes, or until done. Check doneness with a toothpick - when the stuck-in toothpick comes out clean, the cake is done! Take out of the oven and set pan on a rack to cool.


Cousin Louise's Fluffy White Icing

Combine in a bowl/top of a double boiler: 
2 egg whites
3/4 cup white sugar
1/3 cup light corn syrup
2 tablespoons water
1/4 teaspoons cream of tartar
1/4 teaspoons salt

Place over a pot of rapidly boiling water, and beat with your mixer until the mixture stand in peaks -  about 7 - 10 minutes. Remove from heat and add 2 teaspoons vanilla and continue to beat until the mixture is thick enough to spread. Excess frosting (there wasn't any) can be stored in a jar in the refrigerator. 


~~~

YUM!

'till we feast again!
xoabb